Zucchini Soup

Zuke 1.jpg

Tomato soup is fantastic!

And it’s great for those cold months when you really just need some tomato soup and grilled cheese in your belly…

Zucchini Soup 1(1).jpg

But hopefully those months will be behind us soon…

And tomato soup’s cousin has come to town, ready to play!

Zucchini Soup 2(1).jpg

I thought it would be fun to experiment with some zucchini and make it into a soup.

But at the same time I say that, I honestly had no idea it would be this good!

Zucchini Soup 3(1).jpg

Start with some onions and garlic (obviously, the best way to start!)…

Zucchini Soup 4(1).jpg

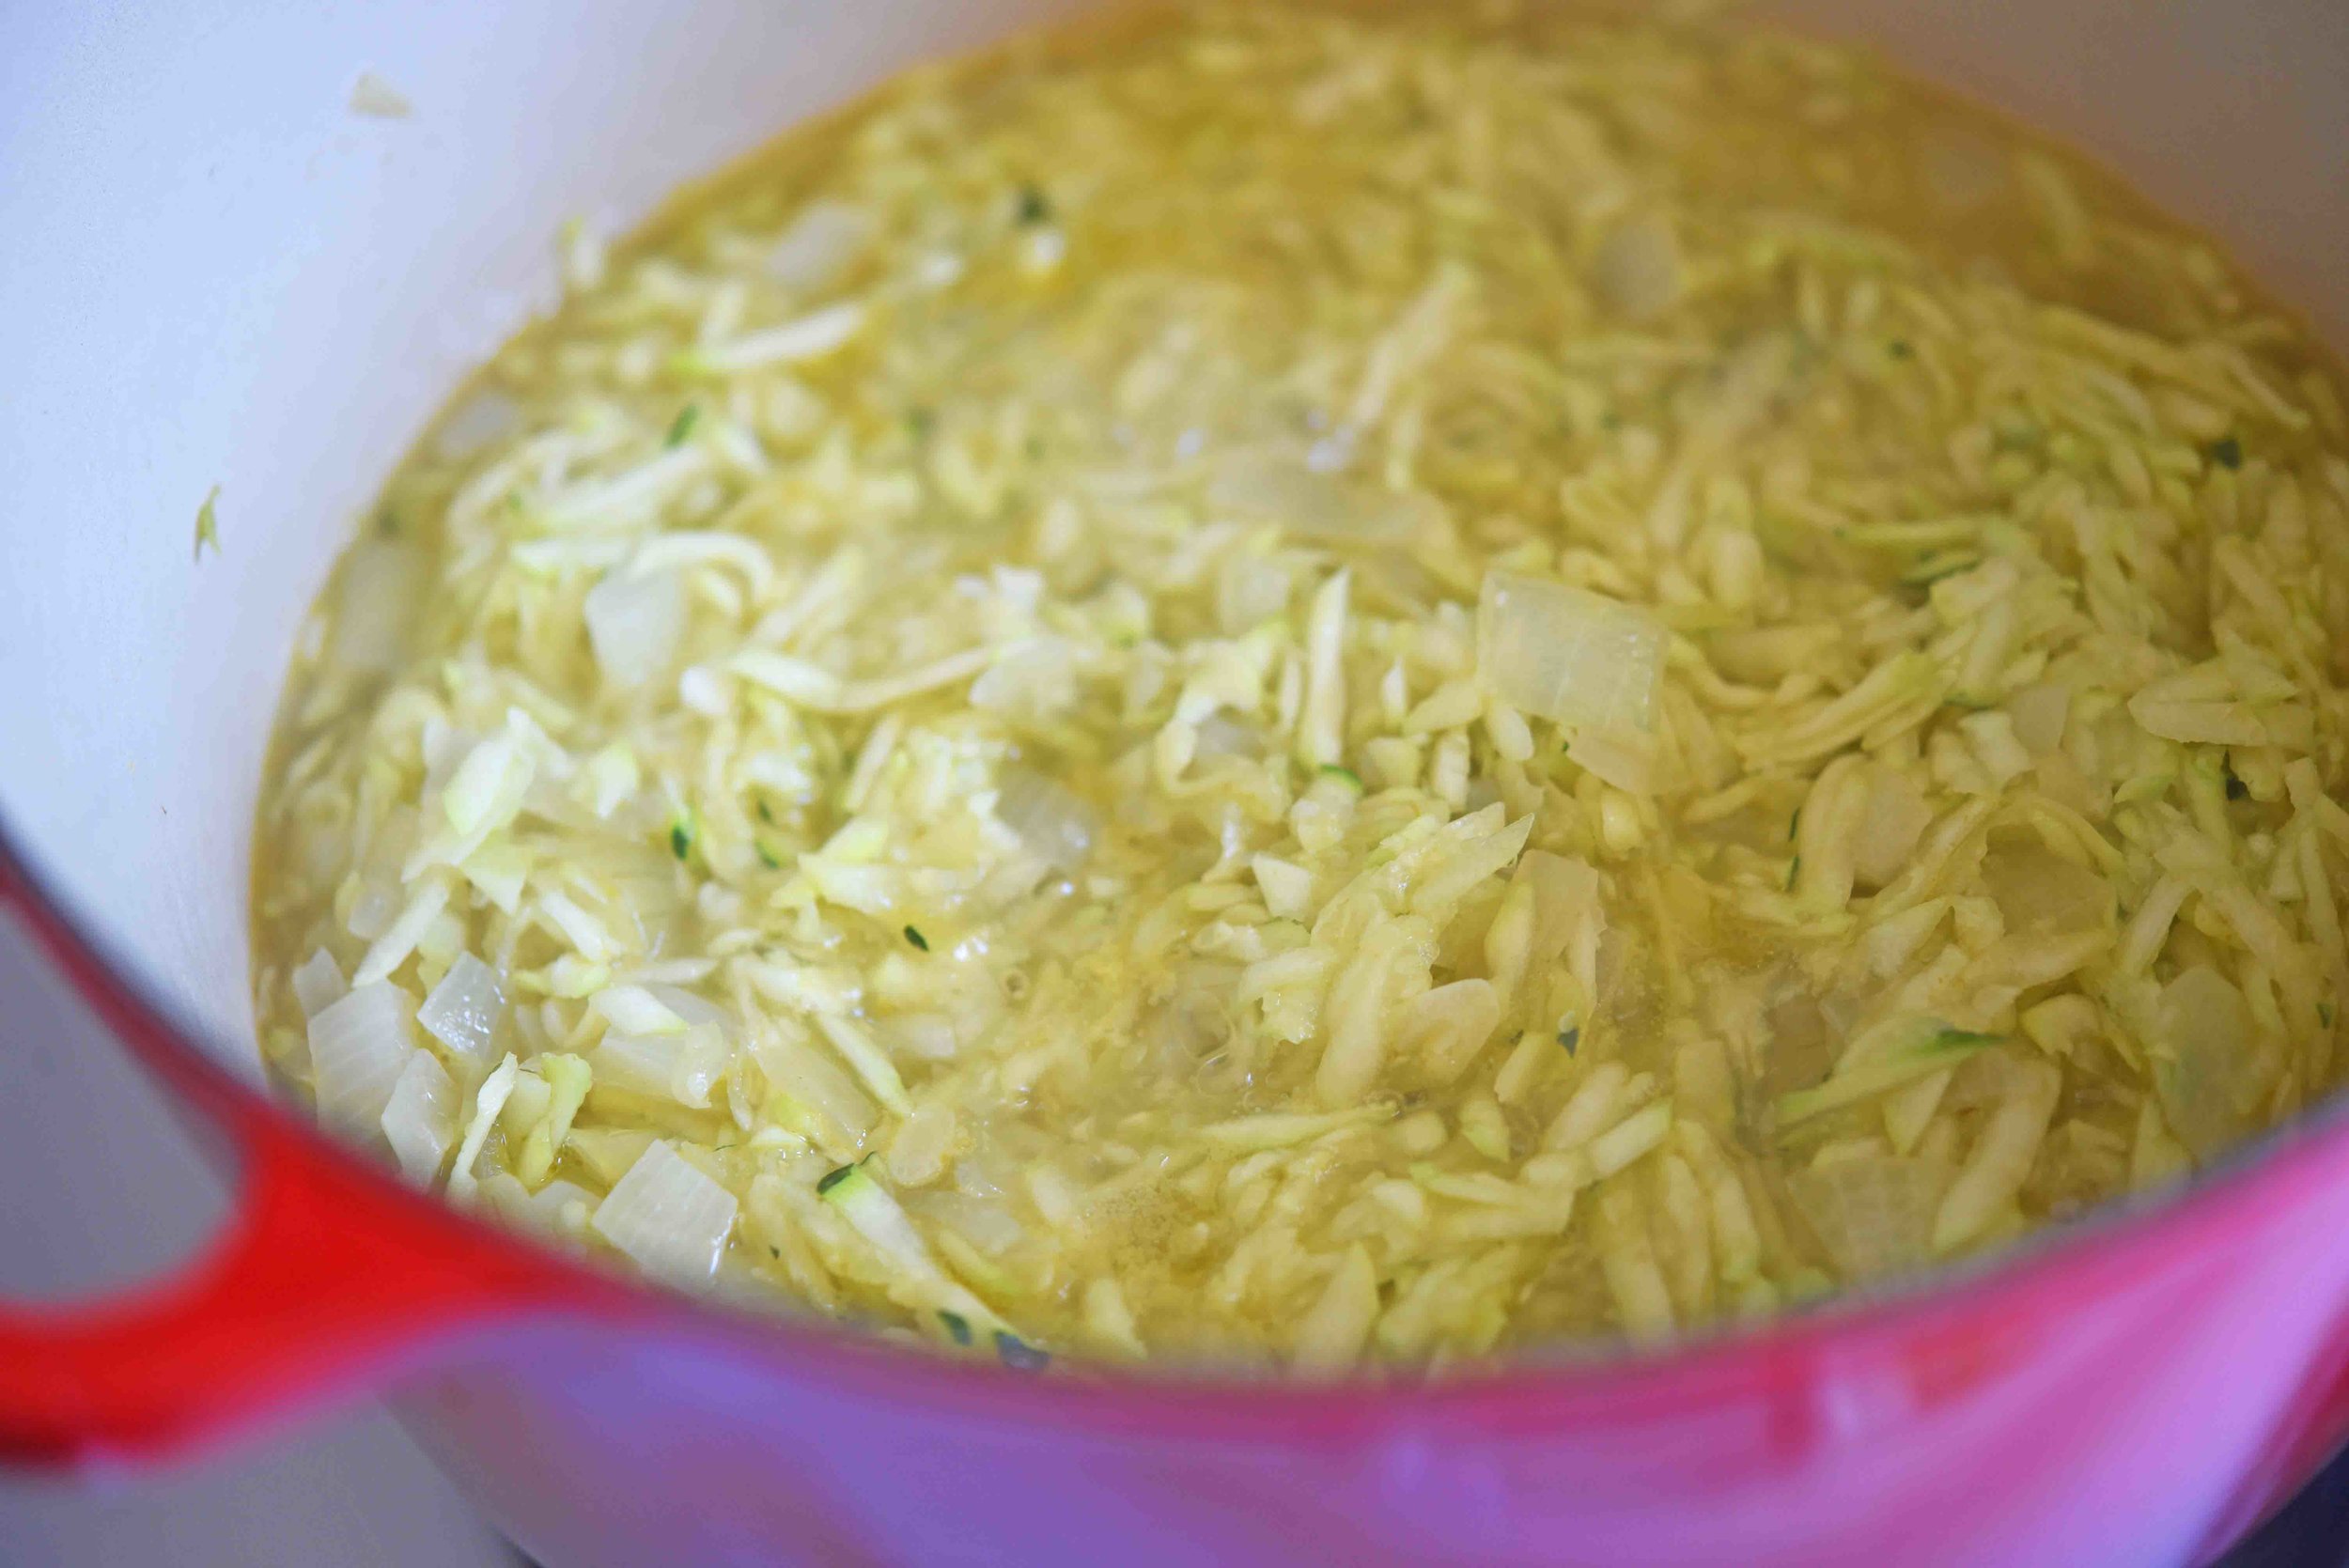
Then add some zucchini and stock…

Zucchini Soup 5(1).jpg

Puree with avocado for creaminess, and then some parm for kick…

And that’s it!

Zucchini Soup 6(1).jpg

It’s silky and light, but still totally satisfying.

If your kids don’t gobble it right up, you’ll have no problem eating all the leftovers!

And when the leftovers are gone, just remember how easy it was to prepare everything and get it on the stove!

Zucchini Soup 7(1).jpg

Zucchini Soup

servings: 2; makes 3 cups

Ingredients:

  • 1 tablespoon olive oil
  • 1 medium yellow onion, roughly chopped
  • 2 garlic cloves, thinly sliced
  • 3 medium zucchini (about 1½ pounds total), peeled + grated, with peels reserved for a garnish
  • 1 cup chicken or vegetable stock
  • ½ medium avocado
  • 1 tablespoon grated parmesan cheese
  • 1¼ teaspoons kosher salt
  • 1 teaspoon finely chopped fresh thyme leaves

Directions:

  1. Heat the olive oil in a large pot over medium heat, then add the onion and garlic and cook them until they are softened but not brown—3 to 5 minutes.
  2. Add the grated zucchini and stock, then bring the mixture to a simmer and cook covered until the zucchini is very soft—about 10 minutes, stirring occasionally.
  3. Meanwhile, cut the avocado in half and remove the pit. Use a soupspoon to scoop the flesh into a blender. Then add the cooked zucchini mixture to the blender and puree its contents until smooth.
  4. Transfer the soup back to the pot and add the parmesan, salt, and thyme, cooking over medium-high until the soup is heated through, about 3-5 minutes.
  5. Serve by dividing the soup into two bowls and garnishing each with the reserved zucchini peels. If you desire, you can also garnish the soup with ground black pepper or additional parmesan cheese.
: @NikkiDinki

: @NikkiDinkiCooking
Zucchini Soup 8(1).jpg
 

Find more recipes like this in MORE VEGGIES PLEASE!


You might also like these recipes:

Sweet Potato Boxed Mac + Cheese

Sweet Potato Boxed Mac and Cheese_SMALL.jpg

For this hack on your mac, I really wanted to bring some veggies to the party—while also giving some new flavors and textures to the mac and cheese.

Sweet Potato Boxed Mac and Cheese_1.jpg

This is an exciting version to say the least, and it still involves almost no extra cooking!

Sweet Potato Boxed Mac and Cheese_2.jpg

Throw the sweet potato in the microwave, then puree it or just mash it with a fork.

Sweet Potato Boxed Mac and Cheese_3.jpg

Add in the the sage, nutmeg, cheese, and sweet potato, then mix it all up and top with pecans and cranberries.

You get a whole new flavor—and seriously the only extra thing you did was put a sweet potato in the microwave!

Sweet Potato Boxed Mac + Cheese

makes: 3 cups

Ingredients:

  • One 14-ounce boxed mac + cheese with liquid cheese sauce (such as Kraft Deluxe Macaroni + Cheese Dinner Original Cheddar)
  • 1 small or medium sweet potato
  • 1 tablespoon finely chopped sage, more for a garnish
  • ½ teaspoon fresh ground nutmeg
  • ½ teaspoon kosher salt
  • 2 tablespoons dried cranberries
  • 2 tablespoons coarsely chopped pecans

Directions:

  1. Place a medium pot of salted water over high heat for cooking the macaroni. When the water boils, add the macaroni and cook according to the package directions; drain when finished.
  2. While the pasta cooks, pierce the sweet potato all over with a fork. Cook the potato in the microwave on high in 2-minute increments until soft—4 to 6 minutes total. Then set the potato aside until it is cool enough to handle.
  3. Peel the sweet potato (alternatively, you can cut the potato in half and scoop out the insides) and place it in the bowl of a food processor. Process until smooth; this should give you about ¾ cup of sweet potato puree. If you don’t have a food processor, you can mash the sweet potato with a fork, adding a little of the hot pasta cooking water to make it easier to mash.
  4. Return the cooked and drained pasta to the medium pot over medium heat, adding the sweet potato puree, cheese sauce packet, sage, nutmeg, and salt, then stir until fully combined.
  5. To serve, garnish with the cranberries, pecans, and additional sage.
: @NikkiDinki

: @NikkiDinkiCooking
Sweet Potato Boxed Mac and Cheese_4.jpg
 

Find more recipes like this in MORE VEGGIES PLEASE!


You might also like these recipes:

Quinoa Crust Cheese Pizzas

Quinoa Crust Cheese Pizza_SMALL.jpg

My kids have LOVED pizza since before they could even say “pizza!”

N_275.jpg

This obviously means that we have pizza once a week in our house (or, possibly four times a week?).

Quinoa Crust Cheese Pizza 1.jpg

Often we go out to one of our local pizza places and then eat our slices in the park.

But lately I’ve been trying to find a version I can make at home that's a little healthier—but still satisfies our need for pizza!

Quinoa Crust Cheese Pizza 2.jpg

These quinoa crust pizzas are remarkably easy.

You just cook up some quinoa and mix it with the eggs—which believe it or not—gives you a nice, sturdy crust.

Quinoa Crust Cheese Pizza 3.jpg

If you're trying to understand how that wet mixture of quinoa, eggs, baking powder, and Italian seasoning forms a crust, you'll have to trust me.

It firms up so beautifully in the oven and is one of the most robust alternative-type crusts I've ever made.

Quinoa Crust Cheese Pizza 4.jpg

This crust has a slightly wheat-y taste, which my kids don’t mind at all.

But if you have an extra picky eater, try making the crust on the thin side and loading on the toppings.

This will allow the focus to be more on the flavors of the sauce and cheese rather than the quinoa.

Quinoa Crust Cheese Pizza 5.jpg

This is the kind of meal I love to make because you don’t feel like you're being healthy—you just feel like you're eating pizza!

Quinoa Crust Cheese Pizza 6.jpg

These are also great to freeze so you have individual-sized pizzas ready to go anytime!

Quinoa Crust Cheese Pizza 7.jpg

Quinoa Crust Cheese Pizzas

servings: Eighteen 4-inch pizzas

Ingredients:

  • 1½ cups quinoa
  • 6 large eggs
  • 1½ teaspoons baking powder
  • 1½ teaspoons Italian seasoning
  • 1½ teaspoons kosher salt
  • 2 cups pre-made pizza or tomato sauce
  • 2 cups shredded mozzarella (16 ounces)

Directions:

  1. Preheat the oven to 450°F. Rinse the quinoa in a mesh strainer and then transfer it to a medium saucepan. Add 3 cups of water and bring to a boil over high heat; cover the pan and turn down the heat to maintain a simmer. Let the quinoa cook until it is tender—10 to 15 minutes, then transfer it to a medium bowl and let it cool.
  2. Mix the eggs, baking powder, Italian seasoning, and salt in a small bowl. Then add this mixture to the cooled quinoa and stir to combine.
  3. Line a baking sheet with parchment paper and pour the quinoa onto it; flatten and shape it with your hands into 4-inch-diameter rounds (using about ¼ cup of dough for each round), ¼- to ½-inch thick.
  4. Place the crusts in the oven and bake them until they are golden brown—about 15 minutes. Remove them from the oven and top each with about 2 tablespoons of the pizza or tomato sauce, then 2 tablespoons of the cheese.
  5. Return the pizzas to the oven until the cheese is melted—5 minutes more.

Notes:

  • If your kids are weary of the quinoa crust, try adding some extra toppings so you have a lot of sauce and cheese and just a little crust in each bite. Another option is to make the crusts a little thinner.
  • To Freeze: Let the crusts cool before adding the toppings; once cooled, add the toppings as in Step 4. Freeze the pizzas topped, but not baked. To heat from frozen, bake at 450°F until the cheese is melted and the crust is thawed through—7 to 10 minutes.
: @NikkiDinki

: @NikkiDinkiCooking
Quinoa Crust Cheese Pizza 8.jpg
 

Find more recipes like this in MORE VEGGIES PLEASE!


You might also like these recipes:

Toddler PB + J with Quick Frozen Fruit Jam

Toddler PB+J with Quick Frozen Fruit Jam_SMALL(1).jpg

There are a lot of delicious peanut butters out there, but not as many good jams. 

Toddler PB+J 1.jpg

So I'd like you to imagine an incredibly tasty jam—a jam that is made simply of fruit and a touch of sugar.

Toddler PB+J 2.jpg

And now that you're conjuring up this super appetizing vision, this is where I say, “Oh, but you can make a jam like that yourself!”

Toddler PB+J 3.jpg

And then you snap out of your jam-filled fantasy and say, “Um, Nikki? I really don’t have time to be making my own jam.”

Toddler PB+J 4.jpg

But here's the thing—you do!

It's as easy as grabbing a bag of frozen berries, adding a tablespoon of sugar, and cooking for only 15 minutes.

That’s it!

Toddler PB+J 5.jpg

And if you want to combine this amazing new jam (that you made!) with some peanut butter and hemp seeds on your favorite bread, you suddenly have a seriously awesome lunch for yourself!

Oh, and your kids, too, of course. ;)

Toddler PB+J 6.jpg

Toddler PB + J with Quick Frozen Fruit Jam

servings: 1 sandwich with ¾ cup of jam

Quick Frozen Fruit Jam:

  • One 10-ounce bag frozen fruit (such as mixed berries)
  • 1 tablespoon sugar

Toddler PB + J:

  • 2 slices sandwich bread (such as whole wheat)
  • 2 tablespoons peanut butter
  • 1 teaspoon hemp hearts
  • 2 tablespoons Quick Frozen Fruit Jam

Quick Frozen Fruit Jam:

  1. In a small saucepan over high heat, combine the frozen fruit, 2 tablespoons of water, and the sugar. Bring this mixture to a high simmer, stirring occasionally and breaking up the fruit with a spoon.
  2. Continue cooking the fruit mixture over high heat, stirring occasionally, until the mixture is thick enough to leave trails in the pan when stirred—10 to 15 minutes.
  3. Remove the pan from the heat and allow it to sit for 10 to 15 minutes, then transfer the fruit mixture to a small bowl. Place the bowl in the refrigerator for at least 30 minutes to allow the jam to set and chill.

Toddler PB + J:

  1. Spread one slice of bread with the peanut butter, then sprinkle it with the hemp hearts.
  2. Spread the Quick Frozen Fruit Jam onto the other slice of bread, then sandwich the two slices of bread together.

Notes:

  • The ¾ cup of jam yielded by the Quick Frozen Fruit Jam can make 6 sandwiches.
  • You can omit the sugar if you prefer; the jam will still be super tasty.
  • If you use tarter fruits, such as cranberries, you may need more sugar.
: @NikkiDinki

: @NikkiDinkiCooking
Toddler PB+J 7.jpg
 

Find more recipes like this in Meat on the Side!


You might also like these recipes:

Broccoli Tater Tots

Broccoli Tots_BIG.jpg

Does anyone really want to eat their broccoli steamed?

Sitting there, waterlogged and sad on the side of the plate?

Broccoli Tots 1.jpg

I don’t know about you, but broccoli tater tots seem like a MUCH more exciting way to eat this green veggie!

Broccoli Tots 2.jpg

Sure, these tots take a minute or so longer than steaming up some florets, but I’ve streamlined the process for you.

And they're the perfect food to store in the freezer, so yes, you can have tots ANYTIME!

Broccoli Tots 3.jpg

To make them, just mix together finely chopped broccoli (stems and all!), throw in some eggs, seasonings, a touch of cheese and flour...

Broccoli Tots 4.jpg

Form them into whatever shapes you like and let them roll around in a flurry of panko and crushed tortilla chips...

Broccoli Tots 5.jpg

Then bake them up into crunchy perfection!

You'll never look at broccoli the same way!

Broccoli Tots 6.jpg

Broccoli Tater Tots

servings: 36 tater tots

Ingredients:

  • ¾ cup crushed yellow corn tortilla chips
  • ¾ cup plain panko bread crumbs
  • ½ teaspoon paprika
  • 1 large bunch broccoli (about 1½ pounds), entire stem + florets coarsely chopped + rinsed
  • ¾ cup grated parmesan cheese (about 3½ ounces)
  • ½ cup all-purpose flour
  • 3 large eggs
  • 2 teaspoons kosher salt
  • 1½ teaspoon garlic powder
  • Pinch of ground black pepper

Directions:

  1. Preheat the oven to 425°F. Add the corn chips to the food processor and pulse until the chip pieces are close to the size of panko breadcrumbs (this should make about 1 cup). If you don’t have a food processor you can also place the chips in a Ziploc bag and smash them with a pan or rolling pin. Then transfer the corn chip pieces to a medium-sized bowl along with the panko and paprika and mix these ingredients well.
  2. Clean the bowl of the food processor, then place the broccoli inside and pulse until it is coarse and grain-like in texture (you should have about 4 cups of this broccoli “rice”).
  3. Transfer the broccoli to a large bowl with the parmesan, flour, eggs, salt, garlic powder, and pepper and mix together to combine.
  4. Using your hands, roll the broccoli mixture and pack it tightly by the tablespoon into tater tot (or other desired) shapes approximately 1 inch wide and 2 inches long. Roll each tot in the corn chip breading mixture, reshaping afterwards if necessary.
  5. Place the formed broccoli tots on a nonstick baking pan or a pan lined with parchment paper. Spray the tots lightly with nonstick olive oil spray and bake them until browned—about 20 minutes.

Notes:

  • Freezer Instructions: Place cooked and cooled tots on a baking sheet or plate in a single layer. Let freeze completely; once frozen place them in a plastic food storage bag. To reheat, place in a 425°F oven on a baking sheet and cook for 10 minutes
: @NikkiDinki

: @NikkiDinkiCooking
 

FIND more recipes like this in MEAT ON THE SIDE!


You might also like these recipes:

White Bean Pancakes

White Bean Pancakes 1_SMALL(1).jpg

Every Sunday my husband takes my daughter, Ivy, to the diner for pancakes while I try to catch up on a weeks-worth of sleep.

White Bean Pancakes 2(1).jpg

Ivy LOVES pancakes.

And when I found out that her iron levels were a little on the low side, I started thinking about how I could get more iron into her diet.

White Bean Pancakes 3(1).jpg

Pancakes were just the thing!

I’ve done Acorn Squash Pancakes, so I figured why not try a new version by adding an iron-rich bean instead of the squash?!

White Bean Pancakes 4(1).jpg

I put a can of drained and rinsed cannellini beans in my batter, and I’m telling you, the result looks and tastes JUST LIKE regular pancakes!

White Bean Pancakes 5(1).jpg

It was so simple (opening a can of beans!) to turn a semi-indulgent breakfast into one we can feel really good about eating!

It’s easy to “eat healthy” when you’re eating like this!

White Bean Pancakes 6(1).jpg

White Bean Pancakes

makes: 10 to 12 medium (4 to 5 inches in diameter) pancakes

Ingredients:

  • One 15-ounce can cannellini beans (about 1¾ cups), rinsed + drained
  • 1½ cups all-purpose flour
  • 1 cup whole milk
  • 5 ounces frozen spinach (about 1 cup), thawed + drained (optional)
  • 2 large eggs
  • 1½ teaspoons baking powder
  • 1 teaspoon vanilla extract
  • ½ teaspoon kosher salt
  • 1 tablespoon unsalted butter

Directions:

  1. Add the beans, flour, milk, spinach (if desired), eggs, baking powder, vanilla, and salt to a blender, and blend this mixture until it is smooth.
  2. Next, add the butter to a large skillet over medium heat. Once the pan is hot, pour about ½ cup of the batter into the pan; this will make one pancake about 4 inches in diameter. Cook the batter until bubbles start to pop on its surface. Then flip the pancake and cook it until the other side is also brown and the edges are dry—about 3 to 5 minutes per side. Repeat with the remainder of the batter.
  3. Serve with extra butter, syrup, fruit, or whatever you like!

Notes:

  • If you prefer fluffier pancakes, separate the yolks and whites of the eggs. Rather than following Step 1 as written, add the beans, flour, milk, spinach (if desired), egg yolks, baking powder, vanilla, and salt, to a blender, and blend this mixture until it is completely smooth; then transfer to a large bowl. Meanwhile, beat the egg whites in a medium bowl with a handheld electric mixer on medium-high until they are white and fluffy and have soft peaks (they should be about 4 times larger than their starting size)—about 2 minutes; you could also whisk by hand or do this in a stand mixer. Gently fold the whipped egg whites into the bean and flour mixture, deflating them as little as possible. Then proceed to Step 2 as written above.
: @NikkiDinki

: @NikkiDinkiCooking
White Bean Pancakes 7(1).jpg
 

Find more recipes like this in Meat on the Side!


You might also like these recipes:

Sundried Tomato + Pesto Mac and Cheese Cups

Baked Boxed Mac and Cheese Cups 2_SMALL(1).jpg

Why make your mac and cheese into a cup?

Baked Boxed Mac and Cheese Cups 1.jpg

Why not?!

It’s cute, your kids will be more likely to eat it no matter what is inside, and you can serve it at parties!

And did I mention how cute it is?!

Baked Boxed Mac and Cheese Cups 2.jpg

For this hacked version of mac and cheese, I'm adding sundried tomatoes and pesto.

Two easy-to-find, jarred ingredients that suddenly make mac and cheese feel elegant!

Baked Boxed Mac and Cheese Cups 3.jpg

All you need to do is make the mac, add the sundried tomatoes, top it with pesto and parm, bake and serve!

Baked Boxed Mac and Cheese Cups 4.jpg

The tomatoes deepen the flavor, while the zingy pesto adds a fresh note!

Baked Boxed Mac and Cheese Cups 5.jpg

It’s mac and cheese that you can suddenly serve to guests!

Or just devour standing in the kitchen on a Tuesday night.

Either way, you win.

Baked Boxed Mac and Cheese Cups 6.jpg

Sundried Tomato + Pesto Mac and Cheese Cups

makes: 10 cups

Ingredients:

  • One 14-ounce box of macaroni and cheese (with liquid cheese packet)
  • ½ cup coarsely chopped sundried tomatoes
  • ¼ cup basil pesto
  • 2 tablespoons grated parmesan cheese

Directions:

  1. Preheat the oven to 350°F and prepare a non-stick muffin tin with cooking spray. Place a medium pot of salted water over high heat for cooking the macaroni. When the water boils, add the macaroni and cook until al dente—about 9 minutes; drain when finished. Return the cooked pasta to the pot and turn the heat down to medium, then stir in the cheese packet and tomatoes.
  2. Scoop ½ cup of the macaroni mixture into each of the prepared muffin cups, then top each cup with about 1 tablespoon of the pesto and about ½ teaspoon of the parmesan.
  3. Bake the cheese cups until the pasta on the top of each is lightly browned but not crunchy—about 12 to 15 minutes. Allow the cups to sit in the pan to cool for at least 10 minutes before unmolding them.
: @NikkiDinki

: @NikkiDinkiCooking
Baked Boxed Mac and Cheese Cups 1_SMALL.jpg
 

Find more recipes like this in Meat on the Side!


You might also like these recipes:

Lentil + Carrot Chicken Nuggets

Lentil Carrot Chicken Nuggets_SMALL(1).jpg

The classics are the classics for a reason—they're delicious!

Lentil Carrot Chicken Nuggets 1.jpg

Chicken nuggets are simple and simply tasty, and with so many options out there—from the grocery store to McDonalds—you may ask yourself, why make them myself?

Lentil Carrot Chicken Nuggets 2.jpg

Well, I'll tell you why!

These nuggets are worth making because they're unlike anything you can buy.

They're actually half lentils and carrots, and yet they taste like the good-old fashioned chicken nuggets you (and your kids!) are used to! 

Lentil Carrot Chicken Nuggets 3.jpg

The lentils get slightly pureed, which allows them to pretty much melt into the meat.

As for the carrots, you will see some small specks of them in the mix—so if your kids are super weary, you can always skip them.

Or if you’re feeling crazy, you could use parsnips instead!

Lentil Carrot Chicken Nuggets 4.jpg

Like many of my toddler recipes, these are the kinds of things that I make huge batches of and freeze.

Lentil Carrot Chicken Nuggets 6.jpg

And a freezer full of chicken nuggets is a happy freezer indeed!!

Lentil Carrot Chicken Nuggets 8.jpg

Lentil + Carrot Chicken Nuggets

makes: 50 nuggets

Ingredients:

  • 1¾ cups chicken stock
  • 1 cup dry split red lentils
  • 2 cubes chicken bouillon
  • 2 cups grated carrots (about 6 ounces)
  • 1 pound ground chicken
  • ½ cup grated parmesan cheese
  • 1 teaspoon garlic powder
  • 1 teaspoon onion powder
  • 1 teaspoon kosher salt
  • ½ cup Italian breadcrumbs
  • 1 tablespoon olive oil

Directions:

  1. Place the chicken stock, lentils and bouillon in a small saucepan. Bring the stock to a boil, then reduce it to a simmer and cook the lentils until the broth is fully absorbed and the lentils are very soft—about 15 minutes.
  2. Add the carrots to the bowl of a food processor and pulse until they are crumb-like in texture—ground, but not pureed. Then transfer the cooked lentils to the food processor with the carrots and pulse to combine the ingredients.
  3. Next add the chicken, parmesan, garlic powder, onion powder, and salt to the food processor and pulse again until all ingredients are just combined; avoid overmixing.
  4. Scoop the mixture by tablespoons and shape it by hand into nuggets (the easiest way to do this is to form the mixture into a ball, then smash it flat and add dents and curves by hand). Then coat each nugget well in the breadcrumbs.
  5. Heat the oil in a large skillet over medium-high heat; add 10 to 12 nuggets and cook them until all sides of the nuggets are golden brown—4 to 6 minutes per side. Repeat this process until all of the nuggets have been cooked.

Notes:

  • If you prefer to bake the nuggets rather than frying them, preheat the oven to 425°F. Place the prepared nuggets on a parchment-lined or nonstick baking sheet. Spray the nuggets with olive oil cooking spray and bake them until they are light golden and cooked through—about 15 to 20 minutes. Note that the nuggets will be paler in color—not as brown—than if you were to cook them as in Step 5. The air fryer is also a great option!
  • Freeze It: Once nuggets are totally cooked, throw them into a plastic storage bag, and freeze. From frozen reheat the nuggets in an oven preheated to 375°F for 8 to10minutes.
  • Hack It: Don’t think your kids are going to go for a handmade chicken nugget? Try to sneak some veggies in by dipping store-bought nuggets in my homemade BBQ sauce or Ketchup.
: @NikkiDinki

: @NikkiDinkiCooking
Lentil Carrot Chicken Nuggets 9.jpg
 

Find more recipes like this in Meat on the Side!


You might also like these recipes:

Eggplant Zucchini Meatballs

Eggplant Zucchini Meatballs_SMALL.jpg

My stash of freezer foods for my daughter, Ivy, is one of my greatest sources of pride.

Forget a big bank account—if I have a freezer full of Banana Carrot Oat Muffins, Acorn Squash Pancakes, Cauliflower Tater Tots, and Broccoli Tater Tots, I am truly a rich woman.

Eggplant Zucchini Meatballs 1.jpg

My daughter eats like me—she’s definitely a "Meat On The Side" kiddo.

And she wears her bib proudly.

Eggplant Zucchini Meatballs 2.jpg

She eats every veggie under the sun (even if she doesn’t always know it!), which is incredible!

But I do want to get a little meat into her diet.

And since I know meatballs freeze really well, I went to work perfecting one for the whole family.

Eggplant Zucchini Meatballs 3.jpg

And even though the goal is to add meat here, let's be real—I knew right away I wanted to bring veggies to the party.

I also wanted to make a meatball that was a little on the moist side, so it would be perfect for new eaters who don't have all their teeth yet.  

Eggplant Zucchini Meatballs 4.jpg

Pureed roasted eggplant and zucchini add moisture and a depth of flavor that don't just make these meatballs more nutritious—they elevate them to a ridiculously flavorful level.

Eggplant Zucchini Meatballs 5.jpg

The not-so-secret secret?

You're using vegetable puree instead of milk or any other wet element you might normally add to your favorite meatballs.

Eggplant Zucchini Meatballs 6.jpg

And you end up with an awesome meatball.

Or maybe we should call it a vegemeatball.

Or a meateggieball.

Or maybe not 😉 .

Eggplant Zucchini Meatballs 7.jpg

Eggplant Zucchini Meatballs

servings: 30 to 34 meatballs

Ingredients:

  • 1 small eggplant (about ¾ pound)
  • 1 teaspoon olive oil
  • 1 teaspoon kosher salt
  • ½ teaspoon ground black pepper
  • 1 large zucchini (about ¾ pound)
  • 8 ounces ground beef
  • 1 cup Italian breadcrumbs
  • ½ cup grated parmesan (about 2 ounces)
  • 1 large egg
  • 1 teaspoon finely chopped fresh rosemary leaves
  • ½ teaspoon onion powder
  • ½ teaspoon garlic powder

Directions:

  1. Preheat the oven to 400°F. Cut the eggplant in half lengthwise and place the halves cut-side-up on a rimmed baking sheet. Drizzle them lightly with ½ teaspoon of the oil and then sprinkle ¼ teaspoon of the salt and ¼ teaspoon of the pepper over them. Bake the eggplants until they are very soft—about 15 minutes.
  2. While the eggplant is baking, cut the zucchinis in half lengthwise and drizzle them lightly with the remaining ½ teaspoon of oil and then sprinkle them with ¼ teaspoon of the salt and ¼ teaspoon of the pepper.
  3. Remove the eggplant from the oven and add the zucchini cut-side-up to the same baking sheet. Continue to cook the eggplant and zucchini until the zucchini can be easily pierced with a fork and the eggplant is very soft—25 to 30 minutes more. Then remove the baking sheet from the oven, but leave the oven on.
  4. When the vegetables are cool enough to handle, use a spoon to scrape the flesh of the eggplant into a food processor or blender; discard the skin. Then place the entire zucchini (including the skin) into the food processor as well. Process until pureed; this should give you about 1¾ cups of puree.
  5. Transfer the puree to a large bowl, then add the beef, breadcrumbs, parmesan, egg, rosemary, onion powder, garlic powder, and the remaining ½ teaspoon of salt. Mix to combine well and then form the mixture into tablespoon-sized balls by hand and space them evenly on a prepared baking sheet. Bake the meatballs until they are golden brown—about 30 minutes.

Notes:

  • If you wish, you can sauté the meatballs instead of baking them (if your meatballs are on the moist side, this may be a little harder to do). After forming the mixture into balls, heat 1 tablespoon of olive oil in a large pan over medium heat and cook the meatballs, turning occasionally, until they are golden brown on all sides—8 to 10 minutes.
  • To reheat the meatballs, bake them in an oven preheated to 400°F for 10 to 12 minutes.
: @NikkiDinki

: @NikkiDinkiCooking
Eggplant Zucchini Meatballs 8.jpg
 

Find more recipes like this in Meat on the Side!


You might also like these recipes:

Silent Recipe!: Veggie Burgers

Burger Time—VEGGIE Burger Time!

I may not be Bobby Flay, but hey, that’s okay, because I’ve got THE secret to making the perfect veggie burgers…

It's been my goal for awhile now to make a bang-up version of a veggie burger.

But every time I really thought about it, I was super intimidated.

I mean, all of those weird ingredients, lots of chopping, and then the fear that after the first bite, the whole thing might just fall apart.

So instead of tackling this daunting task head-on, I've avoided it like the plague.

I just told myself that someday I'd make a better—no, a perfect—veggie burger.

More perfect than any other one out there.

And so when the time came for me to face my fear, I came up with something that makes me wonder what I was so afraid of in the first place.

My Ultimate Veggie Burgers have no weird ingredients, are super dense (for that BIG bite experience!), and look better than some of the best beef patties you've ever laid eyes on!

And my big secret?! Well, watch the Silent Recipe video, and you’ll see…

This Veggie Burger is a game changer.

Ultimate Veggie Burgers

servings: 4 large or 6 small patties

Ingredients:

  • One 15-ounce can brown lentils, rinsed + drained (1½ cup cooked lentils)
  • 8 ounces baby bella mushrooms, sliced (about 3 cups)
  • 1½ cups cooked brown rice
  • ½ cup walnuts halves + pieces
  • ¼ cup all-purpose flour
  • 2 tablespoons barbeque sauce
  • 1 large egg
  • 1¼ teaspoon kosher salt
  • 1 teaspoon garlic powder
  • 1 teaspoon finely chopped fresh rosemary leaves
  • ¼ teaspoon smoked paprika
  • 1 tablespoon olive oil

Directions:

  1. Preheat the oven to 400°F. Spread the lentils and mushrooms on a parchment-lined or lightly sprayed baking sheet and roast them until the lentils are dry and crisp on the outside and the mushrooms are dry and shrunken to half their original size—25 minutes.
  2. Use a wooden spoon to move the mushrooms to the side, then spread the cooked rice in the open space. Return the pan to the oven and cook until the rice is lightly toasted in places and the lentils are very dry—15 minutes.
  3. While the beans, mushrooms, and rice are cooking, place the walnuts in the bowl of a food processor and pulse them until they are coarsely ground. When the lentils, mushrooms, and rice have finished roasting, add them to the food processor and pulse until well-combined, but not completely smooth. Then add the flour, barbeque sauce, egg, salt, garlic powder, rosemary, and paprika and pulse just until all ingredients are combined.
  4. Next, form the mixture by hand into either 4 large patties or 6 small ones. Then heat the oil in a large skillet over medium-high heat. Add the patties and cook them until they are well-browned and crisp—about 3 to 4 minutes per side.

Notes:

  • ¾ cup dried lentils should yield the 1½ cups cooked lentils you need in this recipe. Also, ½ cup uncooked brown rice should yield the 1½ cups cooked rice needed.
  • If you prefer to bake the patties rather than sautéing them, place them on a lightly-sprayed unlined tray and bake them at 400°F until they are golden brown and crispy on the outside, flipping halfway through—about 20 minutes.
  • You can omit the flour for a gluten-free patty. The patties will be slightly less stable, but still very good.
  • To prepare from frozen, bake patties at 400°F for 13 to15 minutes.
: @NikkiDinki

: @NikkiDinkiCooking
 

Find more recipes like this in Meat on the Side!


You might also like these recipes:

Cauliflower Alfredo Sauce with Pasta

Cauliflower Alfredo Kids Version_SMALL(1).jpg

When I create a recipe, I’m always thinking about what different versions of a dish I can suggest to different groups of people.

For instance, sometimes I think about how to make my vegetarian recipes “meaty.”

Or I might toss out some ideas about how to make a dish more family-friendly (something adults can enjoy that kids will also eat!).

I love when—with just a few tweaks—you can make a couple of versions of a meal at the same time, so everyone is satisfied.

Cauliflower Alfredo Process 1.JPG

And it’s always a bonus if we get our kids to eat their veggies!

This Cauliflower Alfredo Sauce is one of the most melt-in-your-mouth pasta sauces I’ve ever made.

And I honestly can’t tell the difference between this version and the full-on-million-calorie version.

Cauliflower Alfredo Process 2.JPG

Actually, I can tell the difference, oh-so-slightly. And I’m not lying when I say I like this one better.

It’s garlicky, cheesy, and creamy—as you would expect.

But the cauliflower adds a whole new element that deepens the flavor and literally makes you want to eat the sauce with a spoon (nooooo, I’ve never done that 😉).

Cauliflower Alfredo Process 3.JPG

And by dividing the sauce in two and adding parsley and pepper to one half and peas to the other, you’ve got a dish that makes both parents and kids happy.

Grownup version: linguine, parsley + freshly ground black pepper.

Grownup version: linguine, parsley + freshly ground black pepper.

Cauliflower Alfredo Sauce with Pasta

servings: 4

Ingredients:

  • 1 large head cauliflower, broken or cut into bite-size florets (about 5 to 6 cups)
  • 3 cups chicken stock
  • 3 garlic cloves, smashed
  • 4 ounces cream cheese
  • 2 ounces parmesan cheese (about ½ cup)
  • ½ cup heavy cream
  • 1½ teaspoons kosher salt
  • ½ teaspoon ground black pepper
  • 1 pound pasta shells
  • 1 cup frozen peas, thawed

Directions:

  1. Place a large pot of salted water over high heat for cooking the pasta shells. To a second large pot, add the cauliflower, chicken stock, and garlic. Bring this mixture to a simmer, then lower the heat to medium and cook until the cauliflower is very soft—10 to 12 minutes.
  2. Transfer the mixture to a blender and add the cream cheese, parmesan cheese, heavy cream, salt, and pepper, and puree until very smooth.
  3. When the water boils, add the pasta shells and cook according to the package directions; drain when done.
  4. To serve, fold the cauliflower sauce and the peas into the pasta.

Notes:

  • The kid’s version is delicious! But if you want to make it a little more adult, replace the pasta shells with linguine. And instead of folding peas in with the cauliflower sauce, fold in about 2 tablespoons of the parsley. Divide among four bowls and top with parsley and freshly ground black pepper. Voilà!
: @NikkiDinki

: @NikkiDinkiCooking
 

Find more recipes like this in Meat on the Side!


You might also like these recipes:

Sausage + Pepper Boxed Mac + Cheese

Sausage and Pepper Boxed Mac and Cheese_SMALL(1).jpg

I love this recipe because it makes boxed mac and cheese into a complete meal.

Sausage and Pepper Boxed Mac and Cheese 1.jpg

A complete meal complete with the mouth-watering flavor combination of sausage, peppers, and cheese.

Sausage and Pepper Boxed Mac and Cheese 2.jpg

You sauté up the peppers and sausage while the pasta cooks up, so there's minimal extra time involved in hacking this mac!

Sausage and Pepper Boxed Mac and Cheese 3.jpg

Then it all gets mixed together into one cheesy, porky mess.

Vegetables, protein, cheese, and carbs—not bad for something that (mostly) came out of a box!

Sausage and Pepper Boxed Mac and Cheese 4.jpg

Sausage + Pepper Boxed Mac + Cheese

servings: 4

Ingredients:

  • 4 cups beef stock
  • One 14-ounce box macaroni + cheese with liquid sauce packet
  • 1 teaspoon olive oil
  • 1 medium bell pepper, coarsely chopped
  • 1 link sweet Italian sausage (about 4 ounces), coarsely chopped
  • ½ teaspoon smoked paprika
  • ½ teaspoon kosher salt

Directions:

  1. Add the stock to a large pot over high heat for cooking the macaroni. When the water boils, add the macaroni and cook until al dente—8 to 9 minutes, stirring occasionally; drain when finished, but do not rinse, then return to the pot.
  2. While the pasta cooks, heat the oil in a medium skillet over medium-high heat. Add the pepper, sausage, paprika, and salt and cook until the sausage is browned all over and cooked through—about 5 minutes, stirring to break it up.
  3. Return the pot with the cooked pasta to a burner set at medium heat. Add the cooked peppers and sausage along with the cheese sauce packet, then stir to combine.
  4. To serve, divide evenly among 4 bowls.
: @NikkiDinki

: @NikkiDinkiCooking
Sausage and Pepper Boxed Mac and Cheese 5.jpg
 

Find more recipes like this in Meat on the Side!


You might also like these recipes:

Ultimate Veggie Burgers

ULTIMATE VEGGIE BURGERS!!!

It's been my goal for awhile now to make a bang-up version of a veggie burger.

But every time I really thought about it, I was super intimidated.

I mean, all of those weird ingredients, lots of chopping, and then the fear that after the first bite, the whole thing might just fall apart.

So instead of tackling this daunting task head-on, I've avoided it like the plague.

I just told myself that someday I'd make a better—no, a perfect—veggie burger.

More perfect than any other one out there.

And so when the time came for me to face my fear, I came up with something that makes me wonder what I was so afraid of in the first place.

My Ultimate Veggie Burgers have no weird ingredients, are super dense (for that BIG bite experience!), and look better than some of the best beef patties you've ever laid eyes on!

Like all amazing things we can't have right away, the reward is SO worth the wait!

Ultimate Veggie Burgers

servings: 4 large or 6 small patties

Ingredients:

  • One 15-ounce can brown lentils, rinsed + drained (1½ cup cooked lentils)
  • 8 ounces baby bella mushrooms, sliced (about 3 cups)
  • 1½ cups cooked brown rice
  • ½ cup walnuts halves + pieces
  • ¼ cup all-purpose flour
  • 2 tablespoons barbeque sauce
  • 1 large egg
  • 1¼ teaspoon kosher salt
  • 1 teaspoon garlic powder
  • 1 teaspoon finely chopped fresh rosemary leaves
  • ¼ teaspoon smoked paprika
  • 1 tablespoon olive oil

Directions:

  1. Preheat the oven to 400°F. Spread the lentils and mushrooms on a parchment-lined or lightly sprayed baking sheet and roast them until the lentils are dry and crisp on the outside and the mushrooms are dry and shrunken to half their original size—25 minutes.
  2. Use a wooden spoon to move the mushrooms to the side, then spread the cooked rice in the open space. Return the pan to the oven and cook until the rice is lightly toasted in places and the lentils are very dry—15 minutes.
  3. While the beans, mushrooms, and rice are cooking, place the walnuts in the bowl of a food processor and pulse them until they are coarsely ground. When the lentils, mushrooms, and rice have finished roasting, add them to the food processor and pulse until well-combined, but not completely smooth. Then add the flour, barbeque sauce, egg, salt, garlic powder, rosemary, and paprika and pulse just until all ingredients are combined.
  4. Next, form the mixture by hand into either 4 large patties or 6 small ones. Then heat the oil in a large skillet over medium-high heat. Add the patties and cook them until they are well-browned and crisp—about 3 to 4 minutes per side.

Notes:

  • ¾ cup dried lentils should yield the 1½ cups cooked lentils you need in this recipe. Also, ½ cup uncooked brown rice should yield the 1½ cups cooked rice needed.
  • If you prefer to bake the patties rather than sautéing them, place them on a lightly-sprayed unlined tray and bake them at 400°F until they are golden brown and crispy on the outside, flipping halfway through—about 20 minutes.
  • You can omit the flour for a gluten-free patty. The patties will be slightly less stable, but still very good.
  • To prepare from frozen, bake patties at 400°F for 13 to15 minutes.
: @NikkiDinki

: @NikkiDinkiCooking
 

Find more recipes like this in Meat on the Side!


You might also like these recipes:

Banana Carrot Spinach Oat Muffins

Banana Carrot Spinach Oat Muffins_SMALL.jpg

Stop.

Do not look at this muffin and say, "EW! It's green!"

Instead, I want you to close your eyes and imagine that you're eating a mini banana bread muffin.

Banana Carrot Spinach Oat Muffins 1.jpg

Now open your eyes.

This is when you discover that this same weird green muffin tastes just like banana bread.

Banana Carrot Spinach Oat Muffins 2.jpg

But instead of using banana bread ingredients, I’m using a bag of spinach, some carrots, oats, bananas, and a touch of maple syrup to create a muffin that packs some serious nutritional punch.

Banana Carrot Spinach Oat Muffins 3.jpg

And it's as simple as throwing everything in your food processor, blending it up, and baking.

Banana Carrot Spinach Oat Muffins 4.jpg

I’m telling you, every time I eat one, I have to remind myself that they're good for me.

Banana Carrot Spinach Oat Muffins 5.jpg

And if you’re on board, maybe your kids will be too.

And if you have a little one like mine, they might not yet realize that most kids think a green muffin is a scary thing. 

Banana Carrot Spinach Oat Muffins 7.jpg

Banana Carrot Spinach Oat Muffins

servings: 36 mini muffins

Ingredients:

  • 10 ounces frozen spinach, thawed + squeezed dry (about 1 cup after squeezed)
  • 2½ cups rolled oats, more for a garnish
  • 3 medium ripe bananas, sliced
  • 2 cups grated carrots (about 6 ounces)
  • ¼ cup maple syrup
  • 2 large eggs
  • 2 teaspoons baking powder
  • 1½ teaspoons ground cinnamon
  • 1 teaspoon vanilla extract
  • ½ teaspoon kosher salt

Directions:

  1. Preheat the oven to 350°F. Add the spinach to a blender or food processor and pulse until it is finely chopped and almost pureed.
  2. Add the oats, bananas, carrots, maple syrup, eggs, baking powder, cinnamon, vanilla, and salt to the spinach, then pulse until all ingredients are well-combined and the mixture is almost pureed, but not quite smooth. You may have to stop and stir the mixture a bit to make sure it doesn’t contain any large chunks.
  3. Scoop the batter evenly into 36 cups of a mini muffin tin prepared with cooking spray, then top each muffin with a light sprinkle of the reserved oats.
  4. Bake the muffins until a knife inserted into the center of one of the muffins comes out clean and dry —24 to 28 minutes.
: @NikkiDinki

: @NikkiDinkiCooking
Banana Carrot Spinach Oat Muffins 8.jpg
 

Find more recipes like this in Meat on the Side!


You might also like these recipes:

Cauliflower Tater Tots

Who doesn’t love a tater tot?

Crunchy on the outside, pillowy soft on the inside...

Simple and yet simply satisfying.

So if they're already so good, why would I mess with them and make a different version?

Because cauliflower tater tots are also delicious--that's why!

This recipe isn’t about making a healthy version of something you already love.

It’s about celebrating the tater tot with a new and equally yummy recipe.

And just so you understand how yummy, let me tell you that I have some of these stored in my freezer and the goal is to avoid consuming any more than 12 each day.

It's so hard to do!

Cauliflower Tater Tots

servings: 2 dozen tater tots

Ingredients:

  • 1 small head cauliflower (about 1½ pounds), stemmed, coarsely chopped + rinsed
  • 2 large eggs
  • ½ cup all-purpose flour
  • ½ cup grated parmesan cheese (about 2½ ounces)
  • 1½ teaspoon kosher salt
  • 1 teaspoon garlic powder
  • Pinch of ground black pepper
  • ¾ cup crushed yellow corn tortilla chips
  • ¾ cup plain panko bread crumbs
  • ½ teaspoon paprika

Directions:

  1. Preheat the oven to 425°F. Place the cauliflower into the bowl of a food processor and pulse until it is coarse and grain-like in texture (you should have about 2 cups of this cauliflower “rice”).
  2. Then transfer the cauliflower to a large bowl with the eggs and mix together to combine. Mix in the flour, parmesan, salt, garlic powder, and pepper.
  3. Add the corn chips to the food processor and pulse until the chip pieces are close to the size of panko breadcrumbs (this should make about 1 cup). If you don’t have a food processor you can also place the chips in a food storage bag and smash them with a pan or rolling pin. Then transfer the corn chip pieces to a medium-sized bowl along with the panko and paprika and mix these ingredients well.
  4. Using your hands, roll the cauliflower mixture and pack it tightly by the tablespoon into tater tot (or other desired) shapes approximately 1 inch wide and 2 inches long. Roll each tater tot in the corn chip breading mixture, reshaping afterwards if necessary.
  5. Place the formed tater tots on a nonstick baking pan or a pan lined with parchment paper. Spray the tater tots lightly with nonstick spray and bake them until browned—about 20 minutes. Serve with ketchup if desired.

Notes:

  • Freezer Instructions: Place cooked and cooled tots on a baking sheet or plate in a single layer. Let them freeze completely; once frozen place them in a plastic food storage bag. To re-heat, place in a 425°F oven on a baking sheet and cook for 10 minutes.
: @NikkiDinki

: @NikkiDinkiCooking
 

Find more recipes like this in Meat on the Side!


YOu might also like these recipes:

Banana Carrot Oat Muffins

Banana Oat Carrot Muffins_SMALL.jpg

My daughter, Ivy, loves all carbs (I can’t imagine where she gets it from 😉).

She'll also gobble up anything that looks like a muffin.

And from a mom point-of-view, I know muffins are the perfect food to freeze and pull out as needed.

Banana Oat Carrot Muffins 1.jpg

So I challenged myself to make a super healthy muffin that would taste just as delicious as a regular not-as-healthy one.

My goal was to make this muffin so tasty that not only would Ivy eat it, but the big kids in the house (my husband and I) would gobble it up as well.

Banana Oat Carrot Muffins 2.jpg

The result is a muffin basically made of bananas, carrots, oats, and a touch of maple syrup. You puree all of these ingredients up and put the batter in the cups of a muffin tin.

These muffins couldn’t be easier to make and they actually taste like banana bread!

Whenever I’m eating one I have to remind myself how healthy they are because all I’m thinking is, I’m in muffin heaven.

Banana Oat Carrot Muffins 3.jpg

Now don’t get me wrong, they're a little denser than a regular muffin (they're all oats instead of flour, so that's why that happens).

And they're a touch more moist than you might be used to (this makes them perfect when re-heated though!).

But the fact that you can eat ten of these and still feel like Healthy Eating Champion of the World makes it all worth it!

Banana Oat Carrot Muffins 4.jpg

Banana Carrot Oat Muffins

makes: 36 mini muffins

Ingredients:

  • 2½ cups rolled oats, more for a garnish
  • 3 medium ripe bananas, sliced
  • 2 cups grated carrots (about 6 ounces)
  • ¼ cup maple syrup
  • 2 large eggs
  • 2 teaspoons baking powder
  • 1½ teaspoons ground cinnamon
  • ½ teaspoon kosher salt

Directions:

  1. Preheat the oven to 350°F. Add the oats, bananas, carrots, maple syrup, eggs, baking powder, cinnamon, and salt to the to a blender or food processor, then pulse until all ingredients are well-combined and the mixture is almost pureed, but not quite smooth. You may have to stop and stir the mixture a bit to make sure it doesn’t contain any large chunks.
  2. Scoop the batter evenly into 36 cups of a mini muffin tin prepared with cooking spray, then top each muffin with a light sprinkle of the reserved oats.
  3. Bake the muffins until a knife inserted into the center of one of the muffins comes out clean and dry —24 to 28 minutes.
: @NikkiDinki

: @NikkiDinkiCooking
Banana Oat Carrot Muffins 5.jpg
 

Find more recipes like this in Meat on the Side!


You might also like these recipes:

Acorn Squash Pancakes

Acorn Squash Pancakes_SMALL(1).jpg

I’m not sure I've ever meet a kid who doesn’t like pancakes.

Acorn Squash Pancakes 1.jpg

What’s not to love?!

Soft on the inside, slightly crisp on the outside—and covered in maple syrup, of course.

Pancakes are pretty much a perfect food.

Acorn Squash Pancakes 2.jpg

But when the mom in me decided I wanted to make pancakes more nutritious, the chef in me knew I could use veggies.

Not only would these pancakes pack more of a nutritional punch, but I was sure the veggies would actually make them sweeter and more perfectly moist.

Acorn Squash Pancakes 3.jpg

As I thought about all of the possible veggies that could to the trick, it didn’t take long to realize that acorn squash was the perfect person for the job.

Acorn Squash Pancakes 4.jpg

Acorn squash's inherent sweetness and velvety texture make these pancakes something you will want to eat everyday—and because of their nutrition factor, something you actually should eat everyday.

Acorn Squash Pancakes 5.jpg

Now I’ll always tell it to you straight, so know that as-written these pancakes are very moist.

My daughter doesn’t mind at all, but if you have kids that are already into classic pancakes, you may want to use less of the acorn squash puree (look for details in the “notes” section of the recipe).

Acorn Squash Pancakes 6.jpg

If you do use a little less puree for a more traditional version, you'll find yourself with the perfect pancake—slightly sweet, warm, and soft yet crisp with a buttery warm yellow color.

And if you go for the more moist "toddler" version, you can truly count your pancake breakfast as a perfectly balanced meal.

Either way, I'd say we're all winners.

Acorn Squash Pancakes 7.jpg

Acorn Squash Pancakes

servings: 10 to 12 four- to five-inch pancakes

Ingredients:

  • 1 large acorn squash (about 2 pounds)
  • 1 teaspoon olive oil
  • 2 cups all-purpose flour
  • ½ cup whole milk
  • 2 large eggs
  • 2 teaspoons baking powder
  • 1 teaspoon vanilla extract
  • ½ teaspoon kosher salt
  • 1 tablespoon unsalted butter

Directions:

  1. Preheat the oven to 450°F. Cut the squash in half lengthwise. Use a soupspoon to scoop out the seeds and discard them. Arrange the squash cut-side-up on a rimmed baking sheet. Drizzle the oil evenly over each piece and then bake the squash until the flesh is tender and can be easily pierced with the tines of a fork—30 to 40 minutes. Set aside until it is cool enough to handle.
  2. Scoop the flesh of the squash into a blender and puree it until it is smooth; this will give you about 2 cups of puree. Then add the flour, milk, eggs, baking powder, vanilla, and salt, and blend this mixture until just smooth.
  3. Add the butter to a large skillet over medium heat. Once the pan is hot and the butter is melted, pour about ½ cup of the batter into the pan; this will make one pancake, about 4 inches in diameter. Cook the batter until bubbles start to pop on its surface and the bottom is nicely browned. Then flip the pancake and cook it until the other side is also brown and the edges are dry—about 3 to 5 minutes per side. Repeat with the remainder of the batter.
  4. Serve with extra butter, syrup, fruit, or whatever you like!

Notes:

  • You can decrease the amount of squash you use in the recipe, using a small squash—about 1 pounds (this will give you about 1 cup of squash puree after blending it). If you do so, also increase the amount of milk to 1 cup and the decrease the baking powder to 1½ teaspoons.
: @NikkiDinki

: @NikkiDinkiCooking
Acorn Squash Pancakes 8.jpg
 

Find more recipes like this in Meat on the Side!


You might also like these recipes:

No-Bake Granola Bars

No-Bake Granola Bars_SMALL(1).jpg

It's back-to-school time!

For a lot of families that means struggling to find time to make food that is healthy but also something your kids WILL eat.

This week, my goal is to bring you some nutritious recipes (well, maybe with the exception of one 😉) that both kids and adults will enjoy.

No-Bake Granola Bars 2(1).jpg

I love a good granola bar, so I thought that might be the perfect thing to kick off the weeksimple to make and great for school lunches or after school snacks.

A while back I started testing recipes in search of a great one I could make and keep on hand...

No-Bake Granola Bars 3(1).jpg

I tried baked ones, different combos of ingredients, and in the end found this relatively simple one the best by far.

No-Bake Granola Bars 4(1).jpg

I’m using two kinds of nuts, some hemp seeds, oats, cranberries, and a little cinnamon.

Then I'm folding in peanut butter and honey to make a chewy bar that has some texture, but is still soft enough for my toddler.

No-Bake Granola Bars 5(1).jpg

It’s kind of amazing what mixing just a couple of ingredients can do...

And with NO BAKING!

No-Bake Granola Bars 7(1).jpg

I made mine in a 9 by 13-inch pan (you press the granola bar mixture into a dish to form them into bars), but after eating a pan's-worth this week, I would say that you might want to try them in something a little smaller. That will allow them to be so thicker and hold together even better.

Really though, no matter what shape you make, they will be your family's new favorite snack!

No-Bake Granola Bars 8(1).jpg

No-Bake Granola Bars

makes: 16 bars

Ingredients:

  • 2 cups instant oats
  • ½ cup finely chopped pine nuts
  • ½ cup finely chopped walnuts
  • ½ cup hemp hearts
  • ½ cup dried cranberries
  • 1 teaspoon ground cinnamon
  • ¼ teaspoon kosher salt
  • ¾ cup honey
  • ⅓ cup smooth peanut butter

Directions:

  1. Line a baking dish, no bigger than 11 by 17 inches or 8 by 8 inches, with parchment paper, leaving the paper hang out about 2 to 3 inches over two of the sides (which will allow you to easily lift the finished granola bars from the dish); spray the parchment paper with cooking spray.
  2. In a large bowl, combine the oats, pine nuts, walnuts, hemp hearts, cranberries, cinnamon, and salt, then set aside.
  3. Add the honey and peanut butter to a small saucepan and cook them over medium heat until they are fully combined and just beginning to bubble—about 3 to 5 minutes.
  4. Pour the honey mixture over the oat mixture and stir to coat the dry ingredients evenly and fully.
  5. Firmly press the oat mixture evenly into the pan to ensure the granola bars stay together well; spraying your hands with cooking spray is helpful to prevent the mixture from sticking to them. Chill for at least two hours before cutting.
  6. Remove the granola bars from the pan using the edges of the parchment paper. Cut them into your desired size and enjoy! To store, place in an airtight container in the refrigerator.
: @NikkiDinki

: @NikkiDinkiCooking
No-Bake Granola Bars 9(1).jpg
 

Find more recipes like this in Meat on the Side!


You might also like these recipes: