Everything Spice Pumpkin Cheese Ball

Everything Spice Pumpkin Cheeseball_SMALL(1).jpg

After eating my 124,562nd Everything Bagel with cream cheese, I had an epiphany.

Everything Spice Pumpkin Cheeseball 1.jpg

“I should make this into a cheese ball!”

“Better yet, a PUMPKIN cheese ball!!”

Everything Spice Pumpkin Cheeseball 2.jpg

And thus the Pumpkin Cheese Ball was born.

Everything Spice Pumpkin Cheeseball 3.jpg

I had seen different versions of pumpkin cheese balls on Pinterest.

But most of them involved hours of wait time and a series of rubber bands, which all seemed far above my pay grade (or attention span!).

Everything Spice Pumpkin Cheeseball 4.jpg

There had to be a better way.

And guess what?! I found it!

Everything Spice Pumpkin Cheeseball 5.jpg

Don't worry, I'll share my secret...

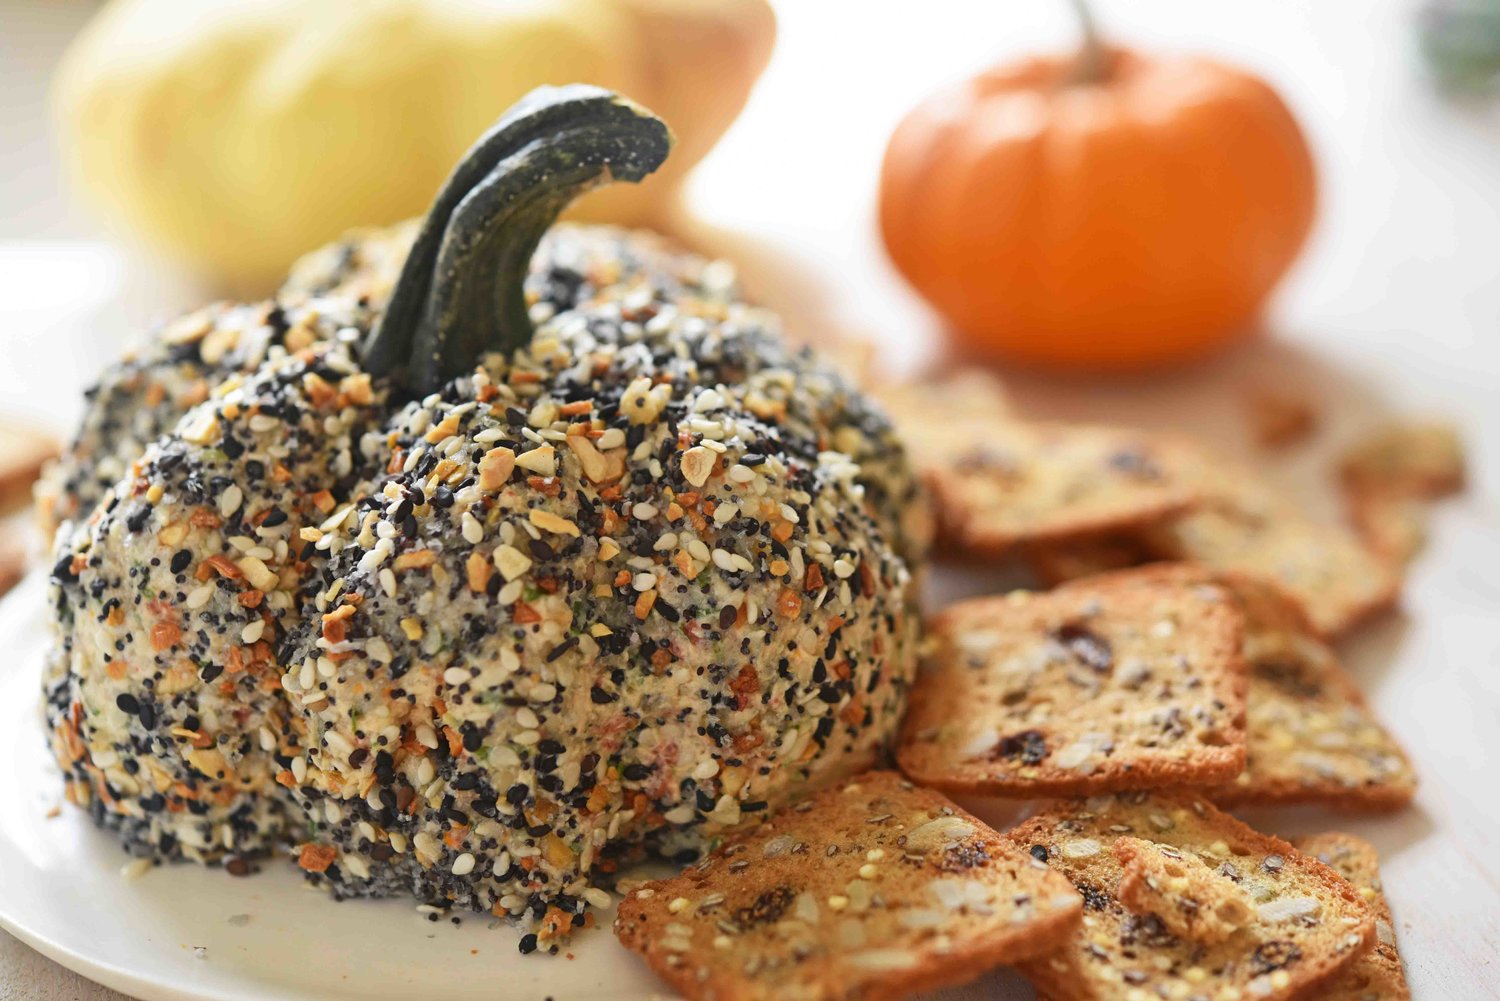
Basically you create a mouthwatering cheese ball made of goat cheese, cream cheese, sundried tomatoes, and scallions.

Cover it in Everything Bagel seasoning, then shape it with a chopstick or spoon.

And for the cutest final effect, top it with a pumpkin stem.

Everything Spice Pumpkin Cheeseball 6.jpg

It’s seriously that easy, and it’s done in 20 minutes.

And once you set it on the table, it will last about the same amount of time!

Everything Spice Pumpkin Cheeseball 7.jpg

Everything Spice Pumpkin Cheese Ball

servings: 10 to 12

Ingredients:

  • 8 ounces cream cheese
  • 5 ounces herbed goat cheese (such as Boursin)
  • ¼ cup finely chopped chives
  • ¼ cup finely chopped sundried tomatoes
  • ¼ cup everything bagel spice mix
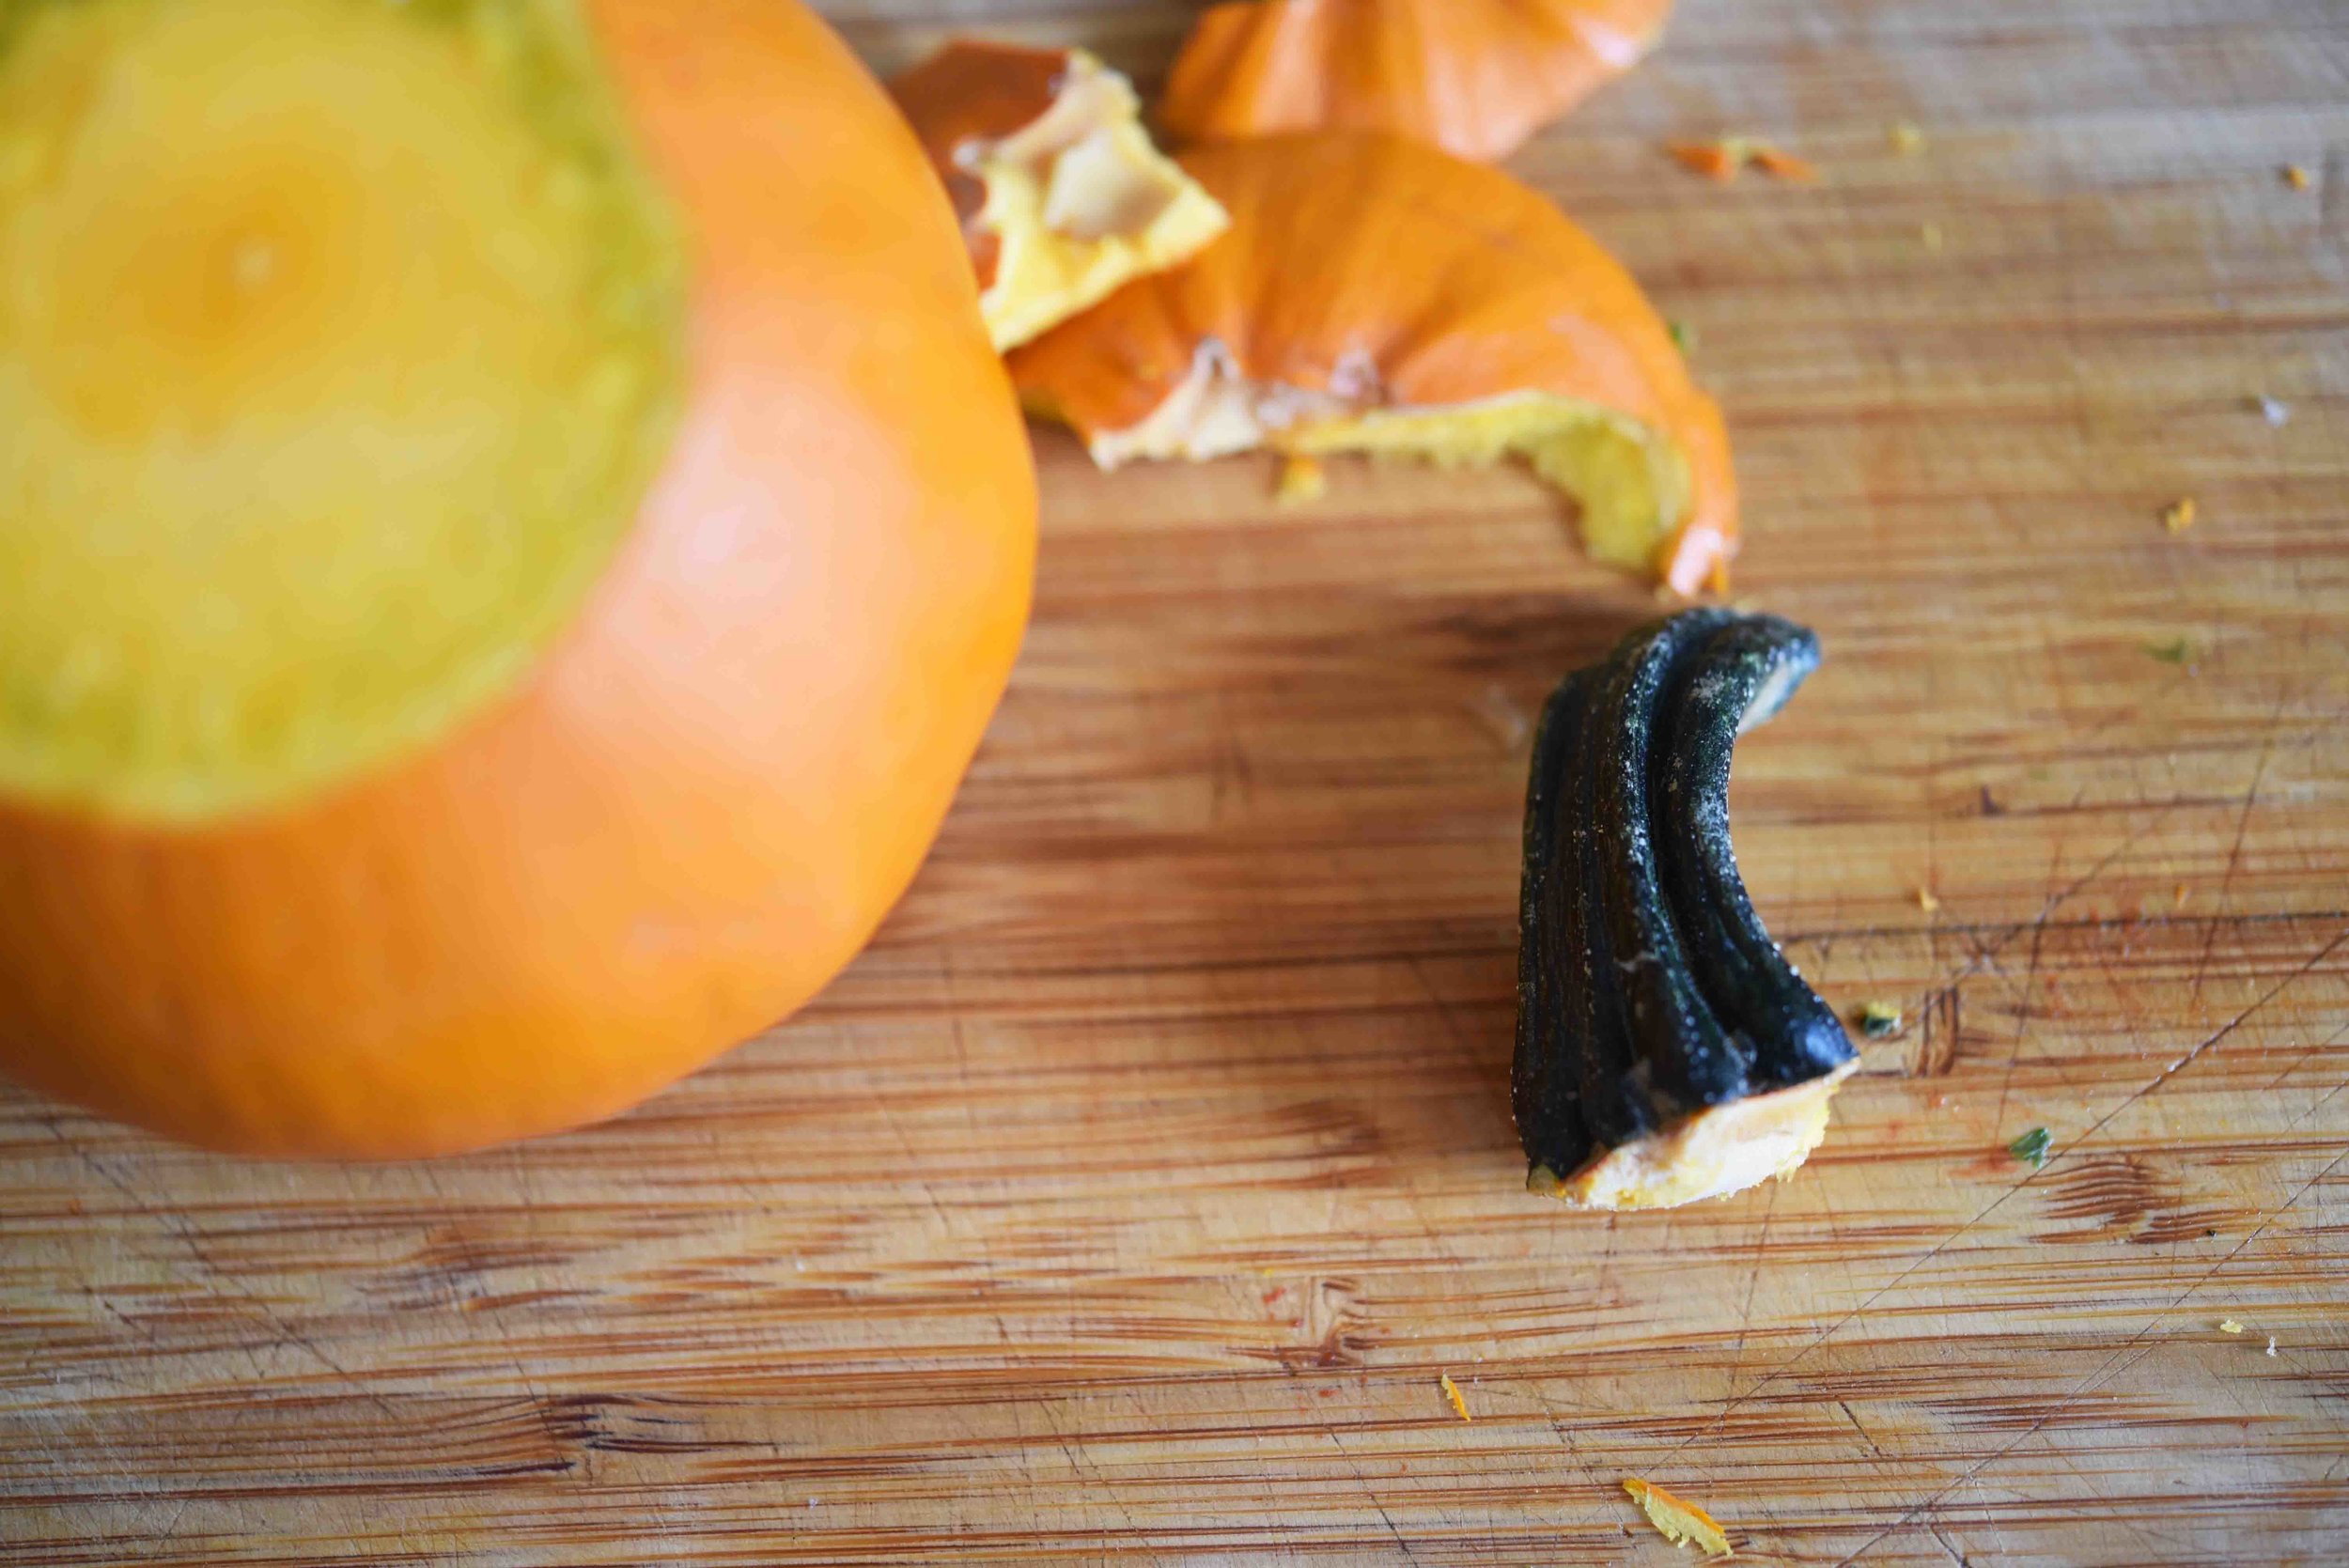
  • 1 stem from small pumpkin or bell pepper

Directions:

  1. Place the cream cheese, goat cheese, chives, and sundried tomatoes in the bowl of a food processor or mixer, then process to combine until the mixture is smooth.
  2. Transfer the cheese mixture to a piece of plastic wrap. Use the plastic along with your hands to form the mixture into a short, squat ball, then place the plastic-wrapped ball in the refrigerator.
  3. Remove the stem from the bell pepper or pumpkin; if you use a pumpkin, it’s easiest to cut off the whole top of the pumpkin straight across, then cut around the base of the stem (rather than trying to break the stem off).
  4. Remove the cheese ball from the plastic and transfer it to a small plate. Pour/sprinkle the spice mix all over the cheese ball, pressing it in so that it sticks and coats the entire ball.
  5. Use a chopstick or spoon handle to press indented lines into the ball that resemble the creases on a pumpkin, then use your hands to smooth and reshape the ball.
  6. Insert the stem into the center of the top of the ball. Serve with your favorite crackers, and enjoy!

Notes:

  • If you’re having difficulty with Steps 4 or 5, try putting your cheese ball back in the refrigerator or freezer to chill longer. It will firm up and may be easier to work with.
  • If you don’t have a pumpkin or bell pepper, you can also use a 2-inch piece of broccoli stem; this also looks great!
: @NikkiDinki

: @NikkiDinkiCooking
Everything Spice Pumpkin Cheeseball 8.jpg
 

Find more recipes like this in Meat on the Side!


You might also like these recipes:

Boxed Mac + Cheese Pancakes

Boxed Mac and Cheese Pancakes_SMALL.jpg

When I was first starting out in the world of food, I was on a radio show here in NYC.

Boxed Mac and Cheese Pancakes_1.jpg

One of the first segments I did was on a hole-in-the-wall diner known for all sorts of crazy-delicious concoctionsone of the concoctions being mac and cheese pancakes.

Boxed Mac and Cheese Pancakes_2.jpg

They made theirs a bit differently than I make mine.

But with both versions, you get the tangy cheese and salty bacon swimming through the pancake, which is obviously a very good thing.

Boxed Mac and Cheese Pancakes_3.jpg

I’m basically taking a box of mac and cheese and adding it to a pancake batter.

Boxed Mac and Cheese Pancakes_4.jpg

Not exactly my healthiest meal ever, but I couldn’t resist recreating those diner mac and cheese pancakes.

Boxed Mac and Cheese Pancakes_5.jpg

Thank you for coming on this Hack Your Mac journey with me this week!

My purpose in reinventing boxed mac and cheese was to show you that you don’t always have to make everything from scratch for it to be delicious.

Boxed Mac and Cheese Pancakes_6.jpg

In real life we take shortcuts, and in real life sometimes we just need to have mac and cheese pancakes for dinner.

I mean, we just need to. 😉

Boxed Mac and Cheese Pancakes_7.jpg

Boxed Mac + Cheese Pancakes

makes: Twelve 3- to 4-inch pancakes

Ingredients:

  • One 14-ounce box of macaroni and cheese (with liquid cheese packet)
  • 4 bacon strips (about 2 to 3 ounces or ¼ cup), some reserved for a garnish
  • 1 cup all-purpose flour
  • 1 cup whole milk
  • 2 teaspoons baking powder
  • ½ teaspoon kosher salt
  • 1 cup coarsely chopped scallions, more for a garnish
  • 1 cup shredded cheddar cheese (4 ounces), more for a garnish
  • 1 tablespoon butter or olive oil

Directions:

  1. Place a medium pot of salted water over high heat for cooking the macaroni. When the water boils, add the macaroni and cook according to the package directions; drain when finished. Stir in the cheese packet, then set aside.
  2. While the macaroni cooks, heat a large skillet over medium heat. Add the bacon and cook until crisp—6 to 7 minutes, turning once. Transfer the bacon to a paper towel to drain, then crumble it into small pieces.
  3. In a large bowl, whisk together the flour, milk, baking powder, and salt until they are fully combined. Then fold in the cooked macaroni along with the scallions, cheddar, and crumbled bacon.
  4. Heat a large skillet over medium heat, then add the butter and allow it to melt. Scoop about ⅓ cup of the macaroni and cheese mixture into the skillet and cook until both sides of the “pancake” are dark golden brown—3 to 5 minutes per side.
  5. To serve, garnish with scallions, cheddar cheese, and crumbled bacon.
: @NikkiDinki

: @NikkiDinkiCooking
bmc.jpg
 

Find more recipes like this in Meat on the Side!


You might also like these recipes:

Eggplant Parm Meatballs

Eggplant Parm Meatballs.jpg
 

I love it when I get to be on The Wendy Williams Show!

Today I showed everyone how to make one of my favorites—Eggplant Parm Meatballs!

They're an amazing add to your favorite pasta dish, but also pretty delicious all on their own!


Eggplant Parm Meatballs

servings: Thirty 1½-inch meatballs

Ingredients:

  • 1 medium eggplant (about 1 pound)
  • 3 teaspoons olive oil
  • 1 teaspoon kosher salt
  • ¼ teaspoon ground black pepper
  • 16 ounces ground beef
  • 1 cup Italian breadcrumbs*
  • ½ cup grated parmesan (about 2 ounces)
  • ½ cup marinara sauce + more for serving
  • 1 large egg
  • ½ teaspoon onion powder
  • ½ teaspoon garlic powder
  • Mozzarella cheese, grated

Directions:

  1. Preheat the oven to 425°F. Cut the eggplant in half lengthwise and place the halves cut-side-up on a rimmed baking sheet. Drizzle them lightly with 1 teaspoon of the oil and then sprinkle ½ teaspoon of the salt and the pepper over them. Bake the eggplants until they are very soft—about 30 minutes.
  2. When the eggplant is cool enough to handle, use a spoon to scrape the flesh of the eggplant into a food processor or blender; discard the skin. Process until everything is completely pureed; this should give you about ¾ cups of eggplant puree. Note: If your marinara sauce is very chunky, puree it with the eggplant.
  3. Transfer the puree to a large bowl, then add the beef, breadcrumbs, parmesan, marinara sauce, egg, onion powder, garlic powder, and the remaining ½ teaspoon of salt. Mix to combine well and then form the mixture into tablespoon-sized balls by hand.
  4. Heat a large skillet over medium heat and add the remaining 2 teaspoons of oil. Place the meatballs in the pan and brown on all sides, working in batches if necessary, cooking until the center is no longer pink—5-7 minutes.
  5. Preheat the broiler to high. Place the meatballs in a serving dish and cover with marinara sauce and mozzarella cheese, then place under the broiler until the cheese is melted. Serve and enjoy!

Notes:

  • If you wish, you can bake the meatballs at 400°F for about 30 minutes.
  • *Depending on the amount of moisture in your eggplant and sauce you may need more breadcrumbs to ensure your meatballs hold together nicely.
: @NikkiDinki

: @NikkiDinkiCooking
 

Find more recipes like this in Meat on the Side!


YOu might also like these recipes:

Butternut Squash + Apple Stuffing

Butternut Squash + Apple Stuffing_SMALL(1).jpg

What’s more satisfying than stuffing?!

Bread, veggies, stockYUM!

Butternut Squash + Apple Stuffing 2(1).jpg

So it's obvious there will be stuffing on the Thanksgiving table, but now the question is...

What veggies do you put in there?

Butternut Squash + Apple Stuffing 3.jpg

What will give you both sweet and savory flavors, along with different textures?

Butternut Squash + Apple Stuffing 4.jpg

Butternut squash immediately popped into my head, even though I can’t say I’ve seen a lot of squash in stuffing.

Butternut Squash + Apple Stuffing 5.jpg

After trying it out though, I know it's the right choice!

The squash is hearty and dense and sweetly contrasts the tartness of the apples and the strong, sharp onions.

Butternut Squash + Apple Stuffing 6.jpg

Good stuffing is nothing fancyit’s all about the right combination of ingredients to make a satisfying comfort food.

Butternut Squash + Apple Stuffing 7.jpg

And when you strike that perfect chord, it's definitely music to your ears…and stomach!

Butternut Squash + Apple Stuffing 8.jpg

Butternut Squash + Apple Stuffing

servings: 6 to 8

Ingredients:

  • One 8-ounce loaf crusty bread, cut into 1-inch dice (about 6 cups)
  • 2 tablespoons unsalted butter
  • 2 tablespoons olive oil
  • 1 medium butternut squash (about 2 pounds), peeled, seeds removed + chopped into ½-inch dice (about 5 cups or 1½ pounds)
  • 1 teaspoon kosher salt
  • ½ teaspoon ground black pepper
  • 2 medium green apples (such as gala apples), chopped into ½-inch dice (about 2 cups)
  • 1 medium yellow onion, coarsely chopped (about 1 cup)
  • 2 stalks celery, coarsely chopped (about ½ cup)
  • 1 teaspoon finely chopped fresh thyme leaves, more for a garnish
  • 1 teaspoon finely chopped fresh sage
  • 3 cups turkey (or chicken or vegetable) stock
  • Crushed pink peppercorns for a garnish

Directions:

  1. Preheat the oven to 400°F. Spread the bread cubes on a baking sheet and toast them until they are dried out—8 to 10 minutes. Remove them from the oven and set aside, but leave the oven on.
  2. In a large skillet over high heat, add the butter and oil. Once the butter has melted, add the squash along with ½ teaspoon of the salt and ¼ teaspoon of the pepper, then cook without stirring until the bottoms of the squash pieces are very dark—12 to 15 minutes. Stir slightly to flip the squash pieces and cook 5 minutes more, then stir again to flip the squash and cook an additional 5 minutes; when you are finished with this process, all sides of the squash should be evenly very dark.
  3. Reduce the heat to medium-high and to the squash mixture add the apples, onion, celery, thyme, sage, and remaining ½ teaspoon salt and ¼ teaspoon pepper. Then add 1 cup of the stock and simmer until the onion and celery are soft—about 5 minutes.
  4. In a large bowl, combine the toasted bread, cooked veggies, and the remaining 2 cups of stock. Once mixed, transfer to a two- to three-quart baking dish sprayed with cooking oil. Bake until the top of the stuffing is crisp and golden brown—20 to 25 minutes. Before serving, garnish with the thyme leaves and pink peppercorns.
: @NikkiDinki

: @NikkiDinkiCooking
Butternut Squash + Apple Stuffing 1.jpg
 

Find more recipes like this in Meat on the Side!


You might also like these recipes:

Beet Cranberry Sauce

Beet-Cranberry-sauce-6.gif

Cranberries have a zingy tartness that brings all of the other foods on your Thanksgiving Day plate to life.

And although the canned stuff may be an old staple on your table, consider clearing some space for this simple--but spectacular!--homemade version.

I start with a traditional cranberry sauce and add some beets that have been put through the blender.

Then I strain out all of that vibrant juice.

The beets add a deeper, richer flavor to the sauce--while still allowing the cranberries to shine.

And if you are a hardcore beet lover, then consider the "Extra Beety" version (also below), a fun beet-forward take that uses chunks of beets instead of just the beet juice! 

Beet Cranberry Sauce

servings: 3 Cups

Ingredients:

  • 1 large red beet (about 6 ounces), diced
  • One 12-ounce bag fresh cranberries
  • 1 cup granulated sugar
  • Zest + juice of 1 orange
  • ½ teaspoon kosher salt

Directions:

  1. Place the beet and 1¼ cups water in a blender and blend until very smooth with only some pulp remaining. Strain the pulp from the beet juice and transfer only the juice to a medium pot.
  2. To the same medium pot, add the cranberries, sugar, orange zest, orange juice, and salt. Cover the pot to avoid splattering and cook over medium heat until the mixture reaches a jam-like consistency—about 25 minutes.
: @NikkiDinki

: @NikkiDinkiCooking

"Extra Beety" Cranberry Sauce

servings: 3 cups

Ingredients:

  • 2 large red beets (about 12 ounces total)
  • One 12-ounce bag fresh cranberries
  • 1 cup granulated sugar
  • Zest + juice of 1 orange
  • 1 teaspoon kosher salt

Directions:

  1. Wrap the beets (all together) in aluminum foil and bake them until you can easily insert a fork into the center of the flesh—45 to 60 minutes. The time can vary greatly depending on the size of your beets, but the good news is that overbaking won’t hurt them at all. Once they are finished cooking, immediately remove the skin from the beets by rubbing each with paper towels and chop the beets into ¼-inch pieces.
  2. Then, to a medium pot, add the beets, cranberries, sugar, orange zest, orange juice, and salt. Cover the pot to avoid splattering and cook over medium heat until the mixture reaches a jam-like consistency, but with some texture still remaining in the cranberries—about 25 minutes.
: @NikkiDinki

: @NikkiDinkiCooking
 

Find more recipes like this in Meat on the Side!


You might also like these recipes:

Mushroom Gravy

My “Meat On The Side” philosophy, at its simplest, is about eating less meat and more veggies.

But if you want to get a little more complex, it's also about infusing vegetables into your meals--not just to make those meals more nutritious, but to elevate those dishes--to make them better.

For this mushroom gravy, I’m creating a super-rich, bold mushroom stock that will heighten your traditional turkey pan gravy to a gravy that tastes like it was made by a master chef!

And if you'd like to make a vegan version--which will still taste better than almost any gravy you've ever tasted--you can thicken it up without adding the turkey drippings.

Oh, and yes, you heard me right…VEGAN!

Your vegan or vegetarian guests will love this seemingly magic gravy they can pour over everything!

And you can still make a separate version with your pan drippings for the rest of the group.

Just sauté up some Portobello mushrooms with browned onions, garlic, thyme and, rosemary.

Add some rehydrated dried porcini mushrooms…

...Strain…

...And thicken with an oil and flour roux (vegan version), or add some flour to your turkey pan to create a traditional turkey dripping roux.

Then the only thing left to do is to prepare yourself (and your guests!) to lick this gravy straight off the plate!

Mushroom Gravy

servings: 2 1/2 cups gravy

Ingredients:

  • ½ cup dried wild porcini mushrooms (0.7 ounce package)
  • 3 tablespoons olive oil
  • 1 medium Vidalia onion, finely diced
  • 1 teaspoon kosher salt
  • ¼ teaspoon ground black pepper
  • One 8-ounce package sliced Portobello mushrooms
  • 4 cloves garlic, minced
  • 1 teaspoon chopped fresh thyme leaves
  • ½ teaspoon chopped fresh rosemary leaves
  • ¼ cup sherry vinegar
  • 1 cup vegetable, turkey or chicken stock
  • 2 tablespoons all-purpose flour

Directions:

  1. Place the porcini mushrooms in a small bowl and cover them with 2 cups of boiling water. Set them aside and allow them to soak for 15 minutes.
  2. Meanwhile, heat 1 tablespoon of the olive oil in a large skillet over medium-high heat. Add the onion, salt, and pepper and cook until the onion browns (you want some color on them)—about 6 minutes. Then add the Portobello mushrooms and continue cooking the veggies until the mushrooms are very brown—about 6 minutes. Next, add the garlic, thyme, and rosemary and cook for 1 minute more.
  3. Pour in the sherry and then scrape the bottom of the skillet vigorously with a wooden spoon or spatula to loosen any brown bits so that they are incorporated into the mixture in the skillet. Cook until most of the liquid has evaporated—about 2 minutes.
  4. Next, add the vegetable stock along with the mushrooms and liquid from Step 1, being careful not to pour all the mushroom broth liquid into the skillet as there will be sediment at the very bottom of the bowl that you will not want to use. Cook until slightly reduced—about 4 minutes.
  5. Strain everything and then set the vegetables to the side (save them for another use or simply serve them as a side dish). Be sure to push on the mushrooms as you are straining in order to remove as much liquid from them as possible.
  6. Add the remaining 2 tablespoons of oil and the flour to a large pan over medium heat and whisk to combine, then allow to cook for 1 minute. Add the mushroom broth, whisking as you go, and cook until thickened—about 5 minutes. OR (for the non-vegan version), add the mushroom broth to your turkey pan once you remove the turkey. Scrape the bottom of the pan with a wooden spoon to loosen up any brown bits, allowing them to become part of the broth. Then pour the broth and brown bits into a liquid measuring cup (or glass bowl) and let it sit until the fat separates from the broth (placing the measuring cup in the refrigerator will speed up this process). Once separated, remove 2 tablespoons of the fat from the top of the measuring cup and add it back to your turkey pan over medium heat, along with the flour (you can discard any additional remaining fat in the measuring cup, but be sure to reserve the broth). Whisk the flour and fat mixture to combine and allow it to cook for 1 minute. Then whisk in the mushroom broth from the measuring cup and cook until thickened—about 5 minutes. *Read the “Keep It Simple” note for ideas about how to make this for a large group.

Notes:

  • Keep It Simple - This is a very rich gravy that you can stretch for a large group—especially if you are combining it with turkey drippings and/or using a turkey or chicken stock instead of veggie stock.
  • Also, for each additional cup of stock you use in this recipe, you will also need to use an additional 1 tablespoon of flour and 1 tablespoon of drippings/oil. For example, if you use 2 cups of stock instead of the 1 the recipe calls for, you will also need to increase the flour to 3 tablespoons and the drippings or oil to 3 tablespoons. Keep extra stock or water on hand to thin if necessary.
  • Find more information on mushrooms at thrivecuisine.com.
: @NikkiDinki

: @NikkiDinkiCooking
 

Find more recipes like this in Meat on the Side!


You might also like these recipes:

Rosemary + Garlic Roasted Parsnips

I think we can all agree that a good Thanksgiving Day table includes a plethora of side dishes.

I love Thanksgiving because millions of people end up eating a “Meat On The Side” meal without really thinking about it.

As much as turkey is considered the star of the meal, most of our plates end up with just a little slab or two of it--the rest of the plate is filled up with vegetable side after vegetable side.

And even though I love the way our plates automatically become veggie-focused, many of these Thanksgiving Day sides can start to taste a little repetitive.

They all seem to be on the softer, mushier side and they all seem to be doused in cinnamon and nutmeg.

So I propose bringing some spicy, chewy, vibrant roasted parsnips to the party!

They have a delightful texture and are perfectly seasoned with rosemary, garlic, and paprika.

And if your main meal menu is already full, consider serving them as an appetizer.

There is nothing like a parsnip chip and a warm cocktail!

Rosemary + Garlic Roasted Parsnips

servings: 1 ½ cups of parsnips; serves 2-3

Ingredients:

  • 3 medium parsnips (about 1½ pounds)
  • 2 tablespoons olive oil
  • 1 tablespoon minced fresh rosemary
  • 1 teaspoon garlic powder
  • 1 teaspoon sweet paprika
  • 1 teaspoon kosher salt
  • ¼ teaspoon ground black pepper

Directions:

  1. Preheat the oven to 450°F. Peel the parsnips and then cut them into ¼- to ½-inch-thick rounds.
  2. In a large bowl, toss the parsnips with the oil, rosemary, garlic powder, paprika, salt, and pepper. Spread them out on a baking sheet, and bake them for 10-15 minutes. Flip the parsnips and bake them until they are brown and crispy—another 10-15 minutes. If your rounds are of varying sizes, some may be done before others; simply remove the smaller rounds as they become brown and crispy and allow the larger rounds to continue to bake. Enjoy warm!
: @NikkiDinki

: @NikkiDinkiCooking
 

Find more recipes like this in Meat on the Side!

You might also like these recipes:

Zucchini Salsa


Recently I was honored to appear on the Food Network television show The Kitchen.


The show includes five amazing co-hosts who introduce viewers to a bunch of awesome recipes, cocktails, and crafts.


Before showing up, I knew I had to bring my A-game—and a recipe that would make people sit up and listen.


Read More

How to Prep + Cook Spaghetti Squash


Spaghetti squash is definitely in my top five of favorite vegetables (please don’t tell the others, they get crazy jealous!).


But breaking into this hard gourd can be intimidating.


The key is to cut off the top (and bottom if it’s not flat) of the squash and cut straight through with a serrated knife.


Scoop out the insides and you are ready to bake.


Read More

Shepherd's Pie Stuffed Baked Potatoes


For almost a decade I bartended and ran a bar here in NYC.


It was a pub: casual, relaxed and the kind of place that welcomed you as much on a Saturday night as it did on a Tuesday afternoon.


Read More

Quinoa-Stuffed Endive with Roasted Grapes + Feta


Let’s face it, quinoa has taken over the grain industry (even though it’s actually a seed). It’s well deserved rise to fame, who wouldn’t want loads of protein and fiber in their starchy side dish, and I do mean LOADS.


It’s true it really good for you, and since it’s been trending on twitter since 2011 you can now find it almost anywhere (P.S. Amaranth (link to popped amaranth recipe) is trending next, time to buy stock).


Read More

Pimento Cheese Grilled Corn


A couple weeks ago I had the pleasure of attending Damaris Philips wedding in Kentucky. It was a day filled with vintage everything, homemade food, love, laughter and some serious dancing.


Damaris made all the food for her wedding (way to show me up Damaris ;) and it was as delicious as you might expect.


Read More

4th of July Recipe Round Up


The 4th of July is just around the corner and that means fun, frolicking, and most importantly FOOD. Most years I find myself making sweet treats for my niece Lucy, as her birthday falls on the 4th. We all like to gather in Fire Island to celebrate as we sing happy birthday and watch the fire works.


To say Lucy loves dessert is an understatement, so I always try my best to put a smile on her sweet little sugar addicted face and make her some incredible treats. No matter what you are making this July 4th it should be easy, should make people smile and if it happens to also be red white and blue than even better. So here are some of my favorite July 4th recipes that will make your weekend that much more sweet.


Red, White + Blue Sangria  by Crista at Peace.Love.Quinoa

Let’s start this 4th of July with fizzy and refreshing white wine sangria's! In this recipe she finishes her sangria off with sparkling water; I think I'm going to skip that part and finish it with some bubbly champagne! The best part about sangria is you can use whatever wine, fruit and juice you like.


Read More

Brown Butter Cucumbers with Popped Amaranth


Today was a day full of exciting stuff:  I stole someone’s car and drove out to Long Island to buy plants for my garden terrace, I tried out a new hair color that’s a little less Barbie doll (but still banging blonde), and I made the most delicious and exciting side dish.


How can a side dish be exciting? Oh now you have opened a can of worms. It's simple; this dish is exciting because I'm preparing a vegetable, in this case cucumber, in a totally different way.


Read More

Roasted Garlic + Broccoli Pita


I like so many different things in life; I like to have tea on my terrace while the birds are singing and the people on the streets are yelling.  I like to find a spot in yoga class which is far enough away from the smelly man who says his “om” with a bear-like grunt.


However, the things I like most of all is to make meaty tasting meals, without the actual meat and to stretch a little bit of meat with other hearty, smoky flavors.


Read More

Cheesy Matzo Bread


I like the taste of matzo bread, I know that many people find it dry and bland, I find it flavorful and…no actually, it’s pretty dry and bland.


However, just because on its own it’s not amazing doesn’t mean we can’t make it amazing. I know that it isn’t bursting with flavor, but it issuper crunchy and it makes a great base to build on.


Read More

Spaghetti Nests


Spring has sprung! Growing up in Buffalo you would think that I would be used to the snow and cold, but that was not the case; instead I was simply over it before I even hit middle school.


So being the kind of person who mumbles obscenities at the weather under my breath all winter long, you can imagine that seeing signs of spring make me a very happy camper.


Read More

Bunnies in Blankets


Bunnies are adorable, they are soft, their ears are far too big for their little heads, and they hop! Let’s face it, they are cute; that is as long as we are talking about a small furry animal and not the random guy hopping up and down behind me on the street. He’s not cute, he’s just creepy.


I tend to make the appetizers for Easter dinner and leave the heavy lifting for my father in-law. It’s hard to help him as I barley have a free hand (no, I cannot put the Sauvignon Blanc down. And what about my other hand?  Well, it’s usually helping me taste test the cheese, a very important job).


Read More

Roasted Acorn Squash


The squirrels in NYC can get a little close... too close for my liking.


Through years of experiencing that getting close to humans results in the receiving of french fries, pretzels and maybe if they're lucky a classic NYC hot dog (probably better that they eat it than us), these little guys have no fear.


Read More

Mango Shrimp Lettuce Wraps


I love food (obviously). And I have made a happy deal with myself that I can have the pasta, garlic bread (and the brownie too) as long as I workout... but this can be a flawed deal.


I only have so many hours to spend in the gym working off said meal and let's face it, working out sucks. So I made a new deal. I cook healthier dishes during the week and the more indulgent selections are kept for the weekends.


Read More